In December and January, I went over the final details of our kitchen renovation and shared our excitement that this really was finally happening. And now that the tile and cabinets have arrived (having filled up our entry hall), its time to follow up on a promise that I would do a post about the budget, and here it is…. First thing to remember… Setting location aside, kitchens are expensive! And when you factor in our location, it can become downright frightening.
The average kitchen renovation in Manhattan is shall we say, much more expensive to do than almost anywhere else in the US. How much? Well, I did a fair amount of Googling and came up with wildly different numbers; keep in mind, the average kitchen in Manhattan is about 65 square feet (about 7ft by 9 ft). Some sites said a basic cosmetic update can be as low as $6,000-$8,000. A basic renovation with new floors, cabinets, countertops, and appliances can start from a low of $12,000-$15,000 for basic tile floors, stock cabinets, laminate counters, and basic appliances, and go up from there. Mid-level renovations tend to start around $40,000 and go up from there, and high end kitchen renovations begin at $80,000 and can run well into the stratosphere (this is NYC we are talking about here). I have seen articles in the NY Times talk about kitchen renovations where the owners were working with budgets well in excess of $100k.
![This is one of the earliest inspiration images we came across back in 2014 and it has continually come up again and again as a source for our overall look. We both love the dark and light and the gracefulness of the glass display cabinet. Although in the end, our look will not be this, but there will be a lot if similarity. [<i>Source: <a href=“http://www.decorpad.com/photo.htm?photoId=94114” target=“blank”>Decor Pad</a></i>]](https://halfclassicsix.com/wp-content/uploads/2015/06/Decorpad.jpg)
This is one of the earliest inspiration images we came across back in 2014 and it has continually come up again and again as a source for our overall look. We both love the dark and light and the gracefulness of the glass display cabinet. Although in the end, our look will not be this, but there will be a lot if similarity. [Source: Decor Pad]
Fortunately for us, we are doing a basic in-place renovation. The layout will essentially remain the same with the stove and sink located in the same place on the same wall as before, and the refrigerator will be located only a couple of feet away from where one was plugged in when we bought the apartment. The gas line will not be touched (period). The plumbing location for the sink isn’t changing either, however we are going to replace the valves supplying the branch lines. As for electric, fortunately when the building went co-op in the 1980s, additional lines were brought into the kitchen (as well as other rooms) to accommodate additional requirements. We are going to add GFI’s to existing outlets to bring them up to safety standards and extend an outlet to reach the other side of the stove.
![This is another image which was a major source of inspiration for our kitchen. I came across this image during my countless hours of obsessing and planning our new kitchen. [<i>Source: <a href="http://www.remodelista.com/posts/house-call-skye-gyngell-chef-at-home-with-british-standard-kitchen" target="blank">Remodelista</a></i>]](https://halfclassicsix.com/wp-content/uploads/2015/06/Marble-countertops-remodelista.jpg)
This is another image which was a major source of inspiration for our kitchen. I came across this image during my countless hours of obsessing and planning our new kitchen. [Source: Remodelista]
| Budget Category | Total Budgeted |
| Appliances | $5,200 |
| Cabinets/Counter tops | $8,300 |
| Finishes and Paint | $500 |
| Fixtures and Lighting | $1,850 |
| Cement Tile Floor | $8,000 |
| Plumbing and Electrical | $1,500 |
| Tools and Misc Materials | $1,550 |
| Beadboard Walls, Baseboards, Trim | $1,900 |
| Devyn’s Workspace | $1,200 |
| Grand Total: | $30,000 |
Where we splurged, where we found savings, and where we lucked out…
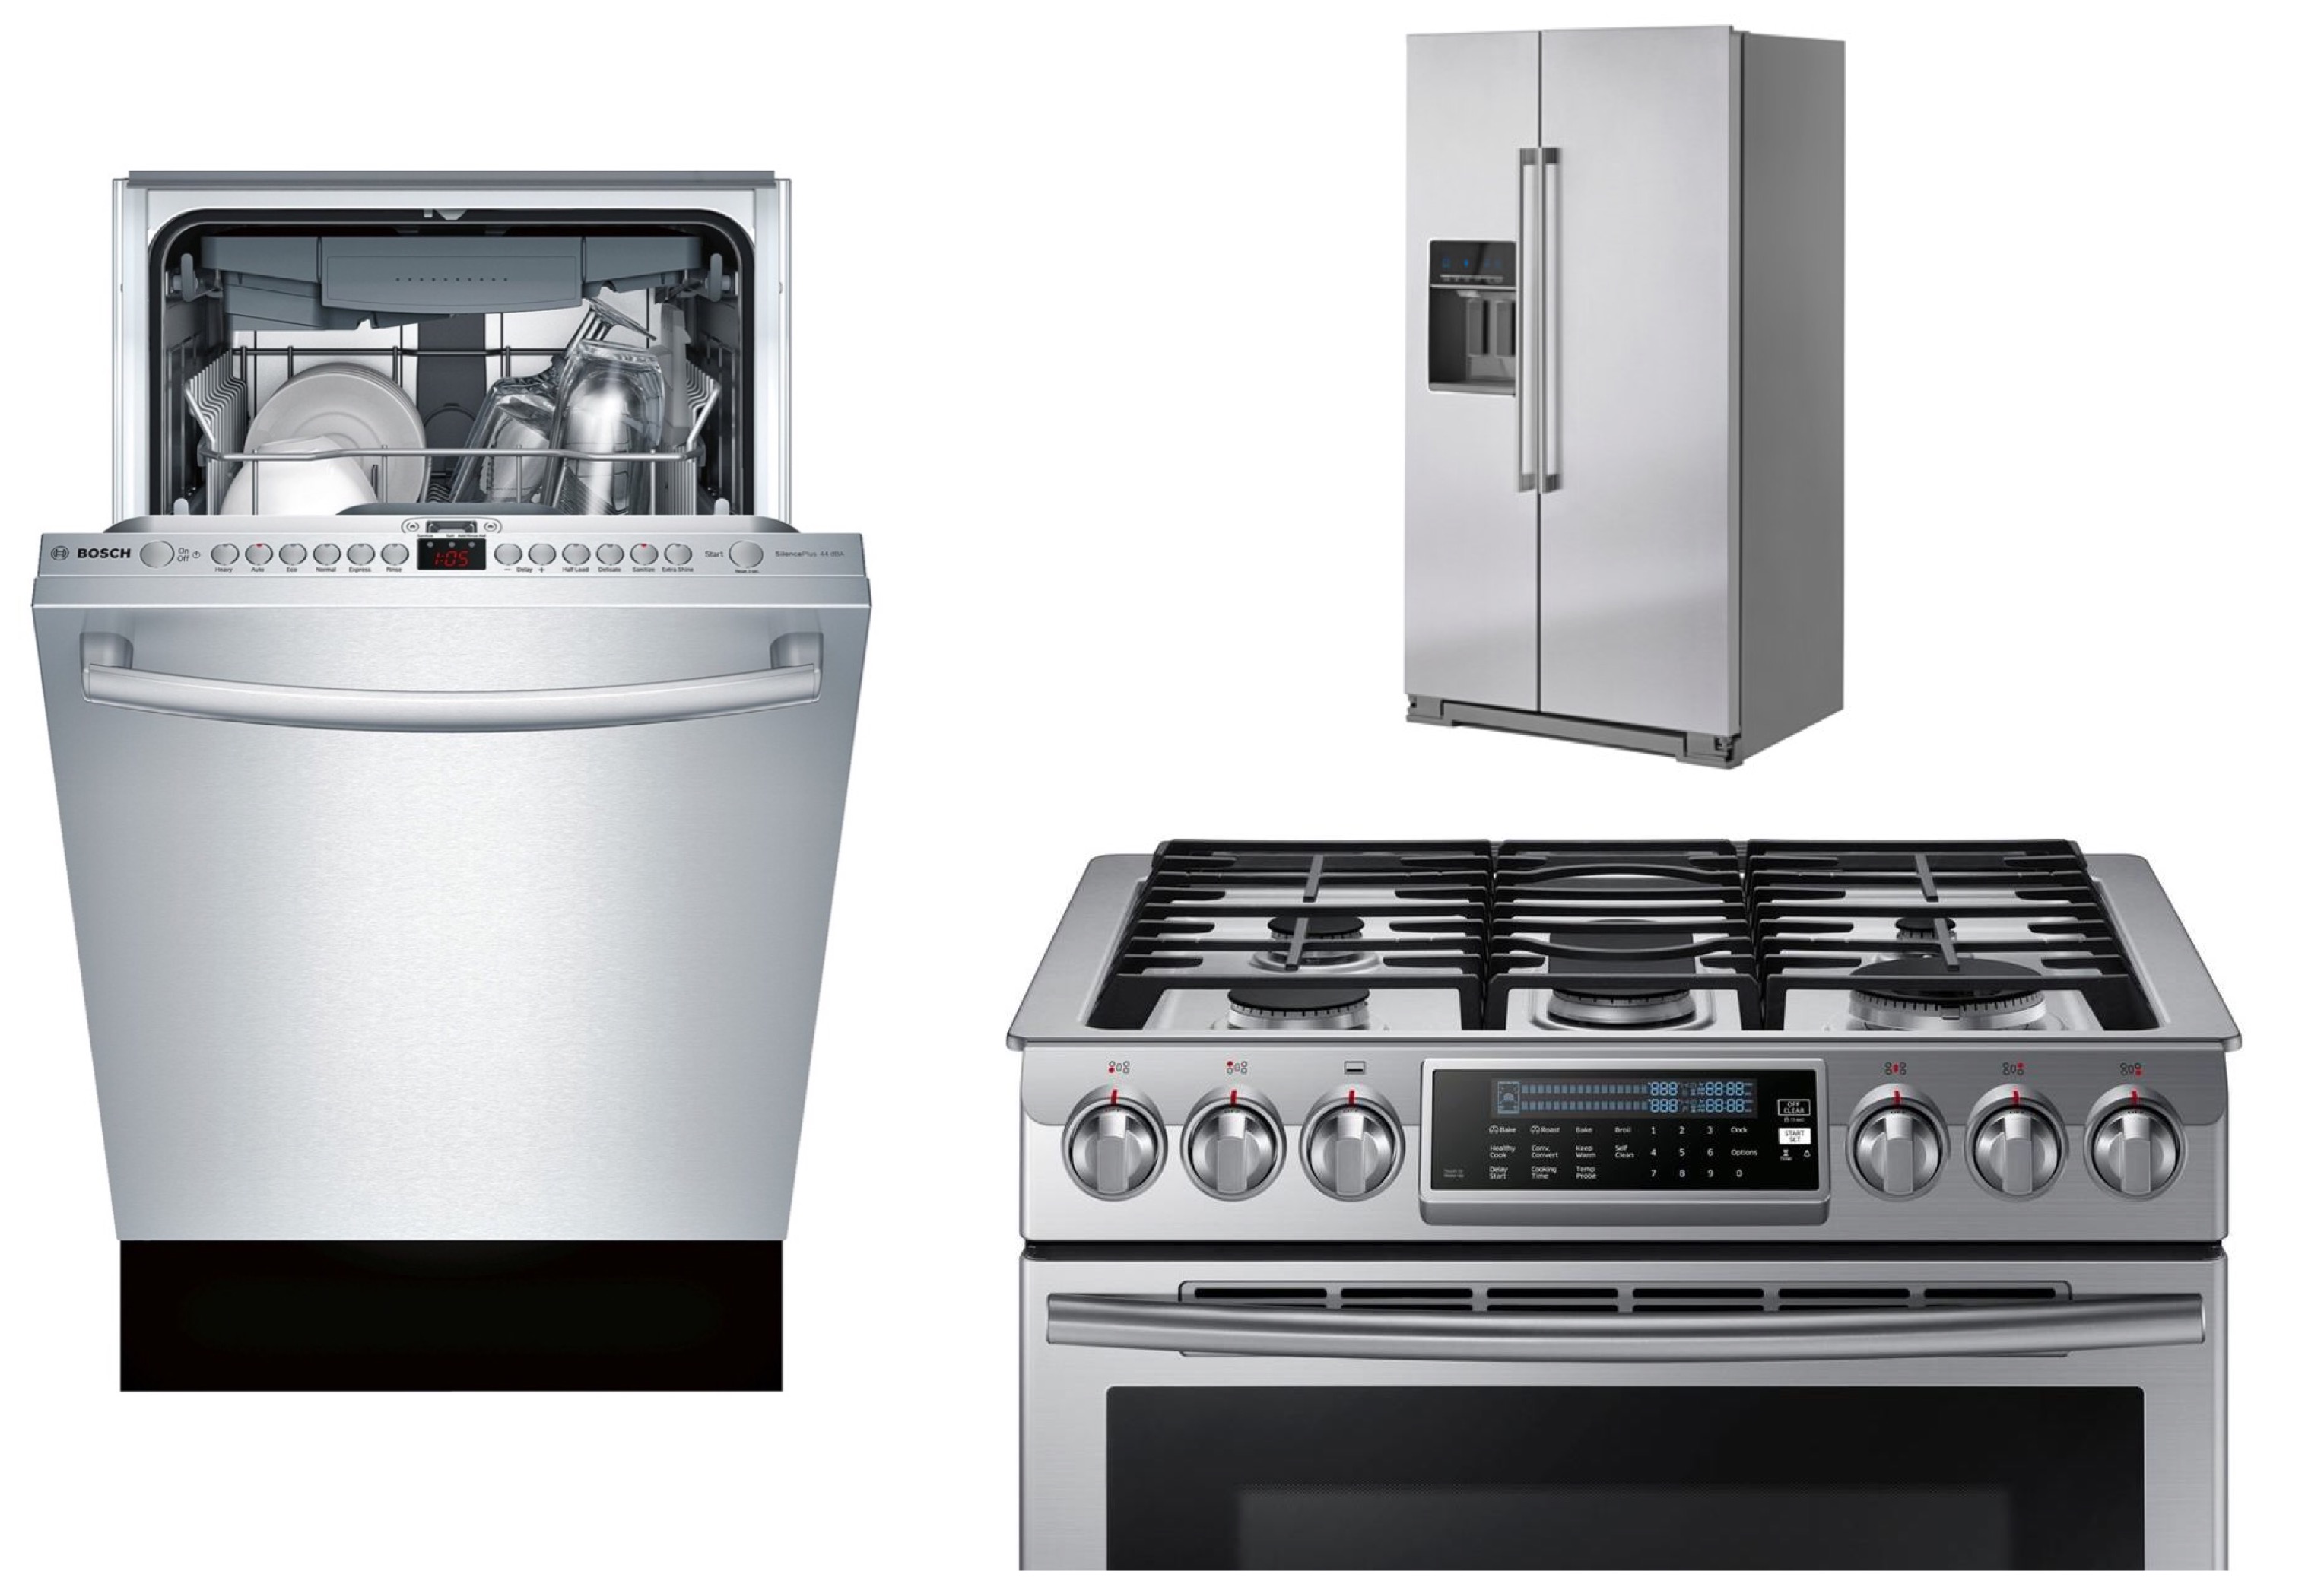
Our appliances are far from high end, but they are still quite nice after decades of crappy undersized apartment appliances.
Appliances – Savings Found:
I went over the details of our appliances in my post about the final plans, but in truth, now that they are all already purchased, we didn’t really splurge on any of our appliances. The IKEA (Whirlpool) refrigerator was $2095 with tax and delivery and has a five year warranty. The Samsung range was way over our budgeted $1500 for a range, but when it went on sale for $1000 off, we couldn’t resist and ended up getting it delivered for $1632 (damned sales tax), and it is much nicer than any of the ranges in our budget. The range hood ended up being lower than the $600 I had budgeted. At only $326 it turned out to be a pretty good deal. The only thing most people would consider a splurge would be our Bosch 18″ dishwasher. At $899, it is quite pricey for a dishwasher, but few options in an 18″ size, and the inferior quality of everything priced lower, it was really the only good option…. It doesn’t hurt that it is a super quiet 44db when running. So, now that they are all purchased, we spent $4952, which is quite a bit less than our $5200 budget for appliances. This is of course, the only category which we have completed all of our shopping.
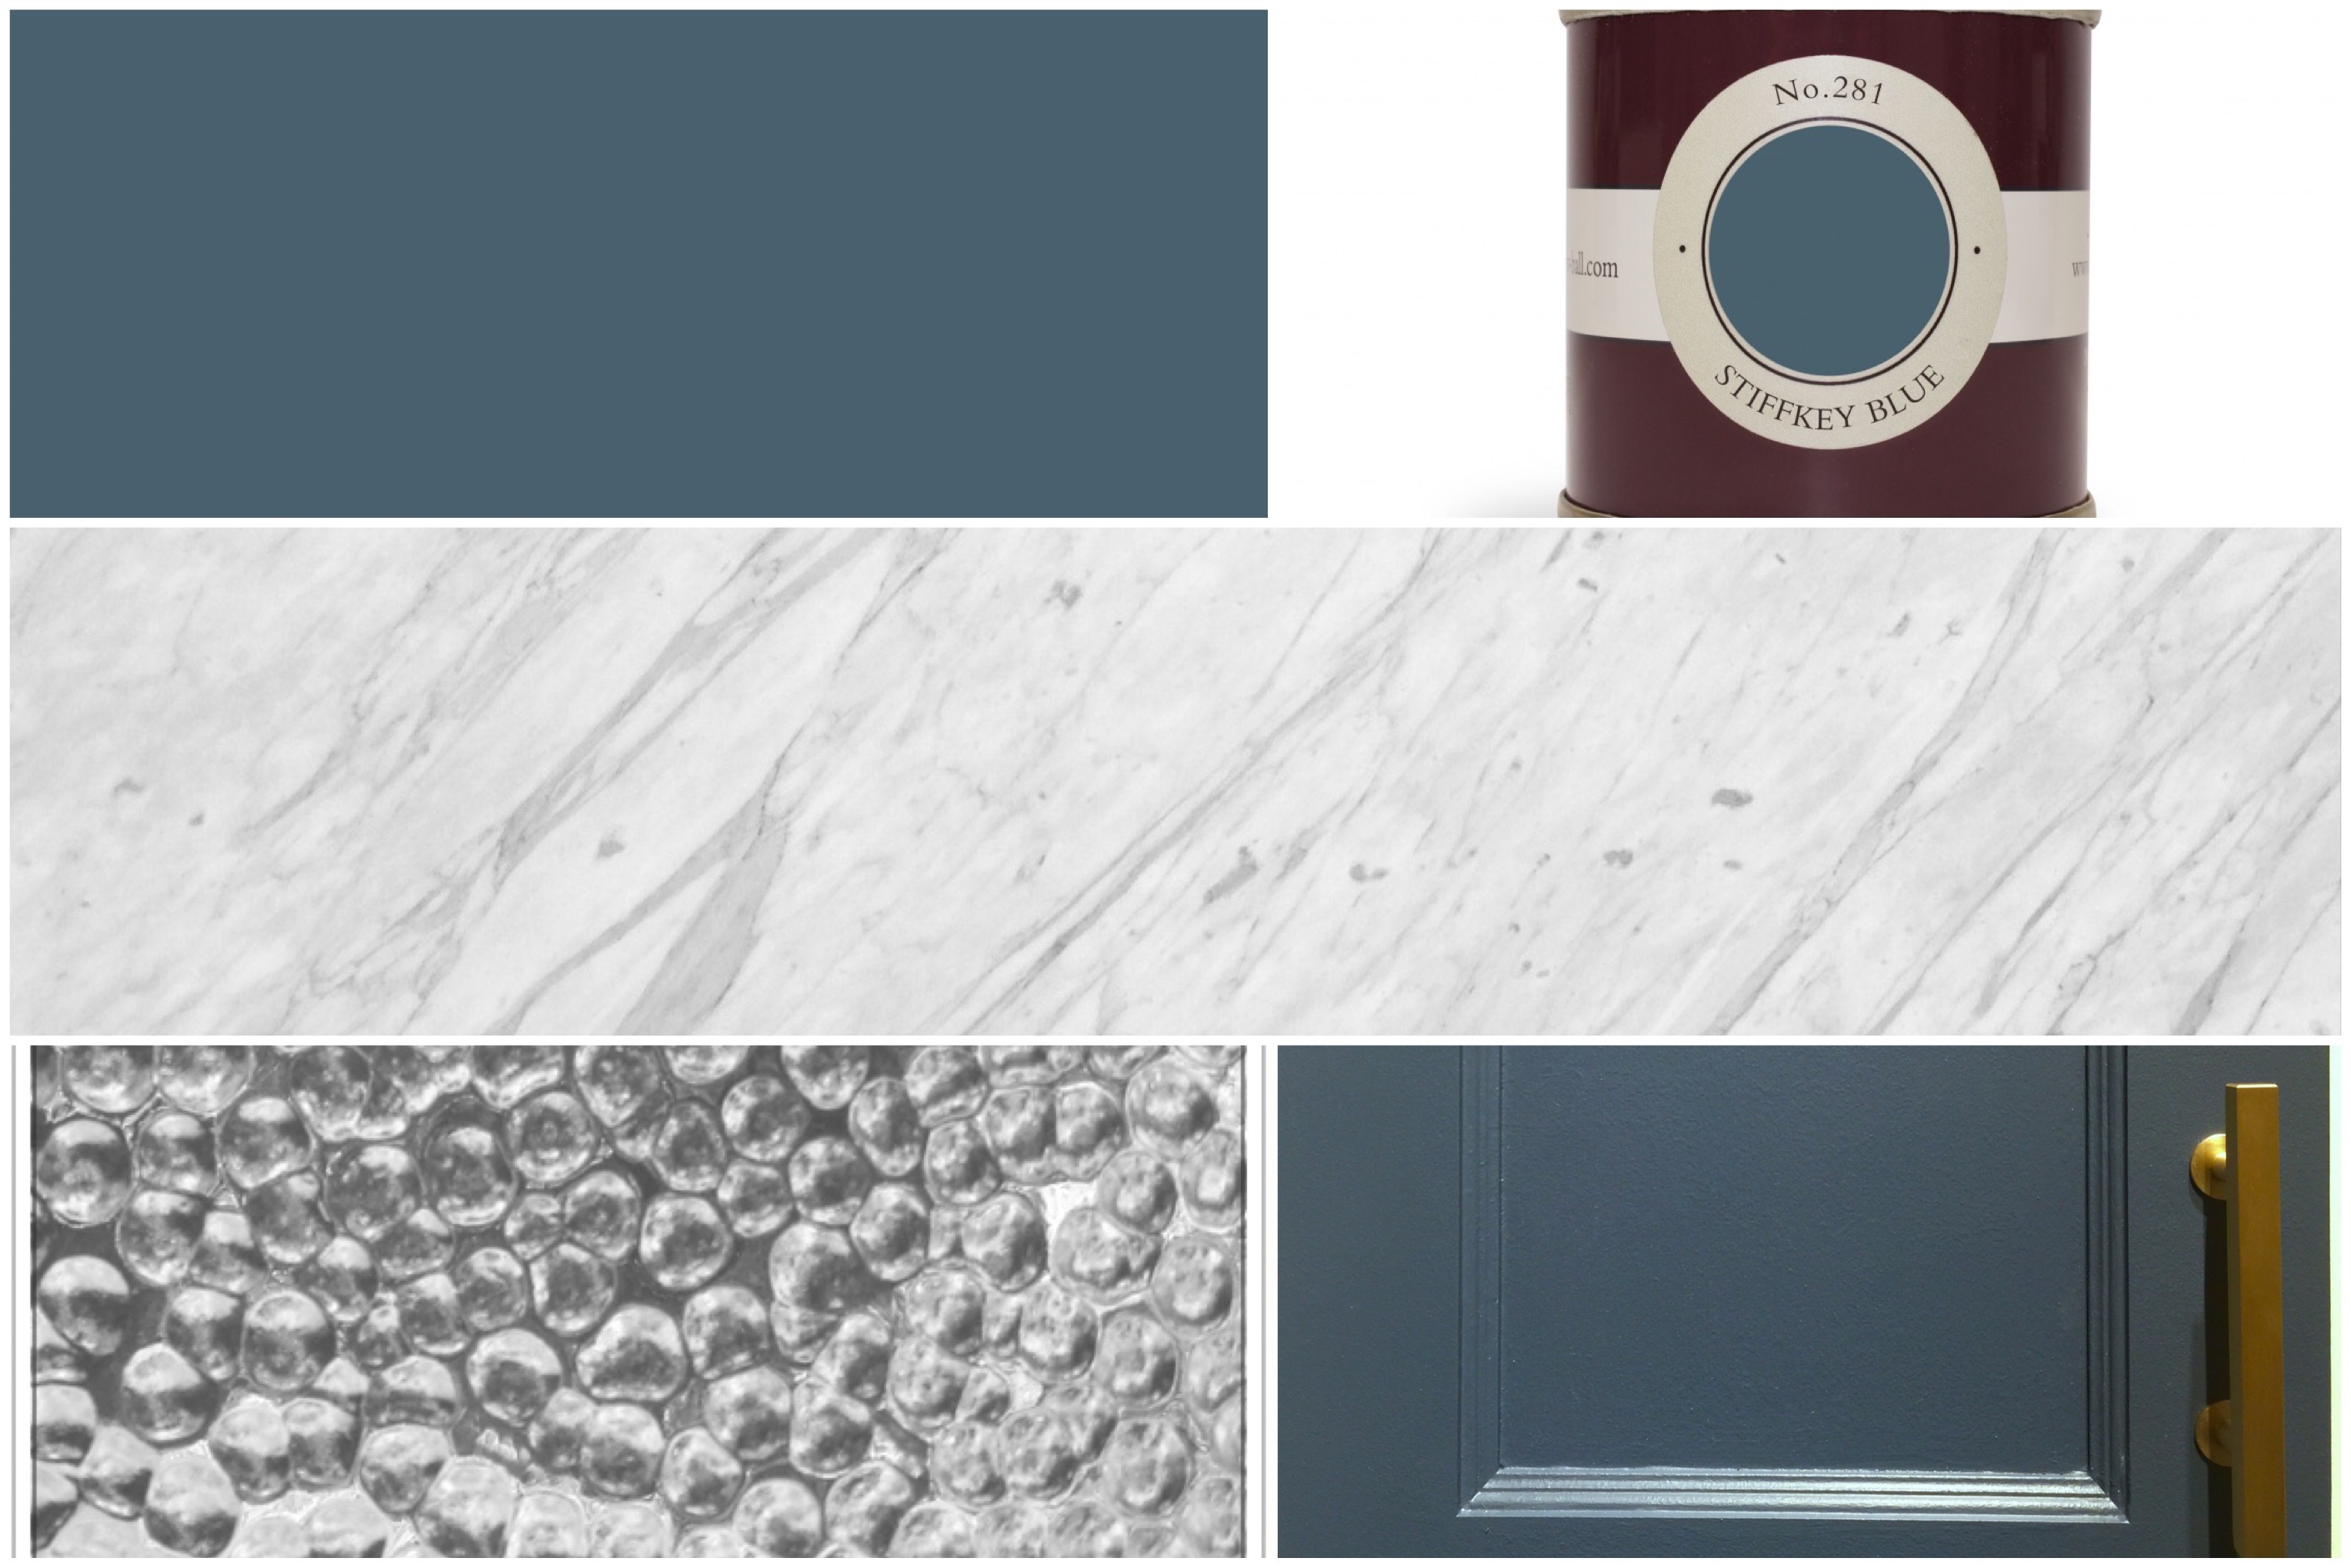
What do you get when you combine Stiffkey Blue cabinets with marble tops and hammered finish textured glass? Our new kitchen of course!
Cabinets and Countertops – Lucked Out:
Yes, Barker Cabinets did cost more than our original IKEA plan with SemiHandmade doors. The original plan would have come in at about $3,600. But by going with Barker Cabinets, we achieved the added flexibility of customizing sizes, allowing for additional cabinets in larger dimensions. This increased the amount of storage space by at least 30%, so the end price of $4,800 is actually very much in line with our original IKEA/SemiHandmade plan when the additional interior space is factored in. As for our countertops, after too many rounds of looking at the alternatives, we decided to accept the risks and go with our absolute favorite; white Carrara marble. Fortunately, in the world of stone counter tops, Carrara is considered to be at the lower end. I expect our marble will run about $100 per square foot installed (factoring in our location), and with 25 square feet of countertop, I estimate it will be about $2500. Together, the cabinets, countertops, textured glass inserts for doors, paint, and trim will end up around $8,500
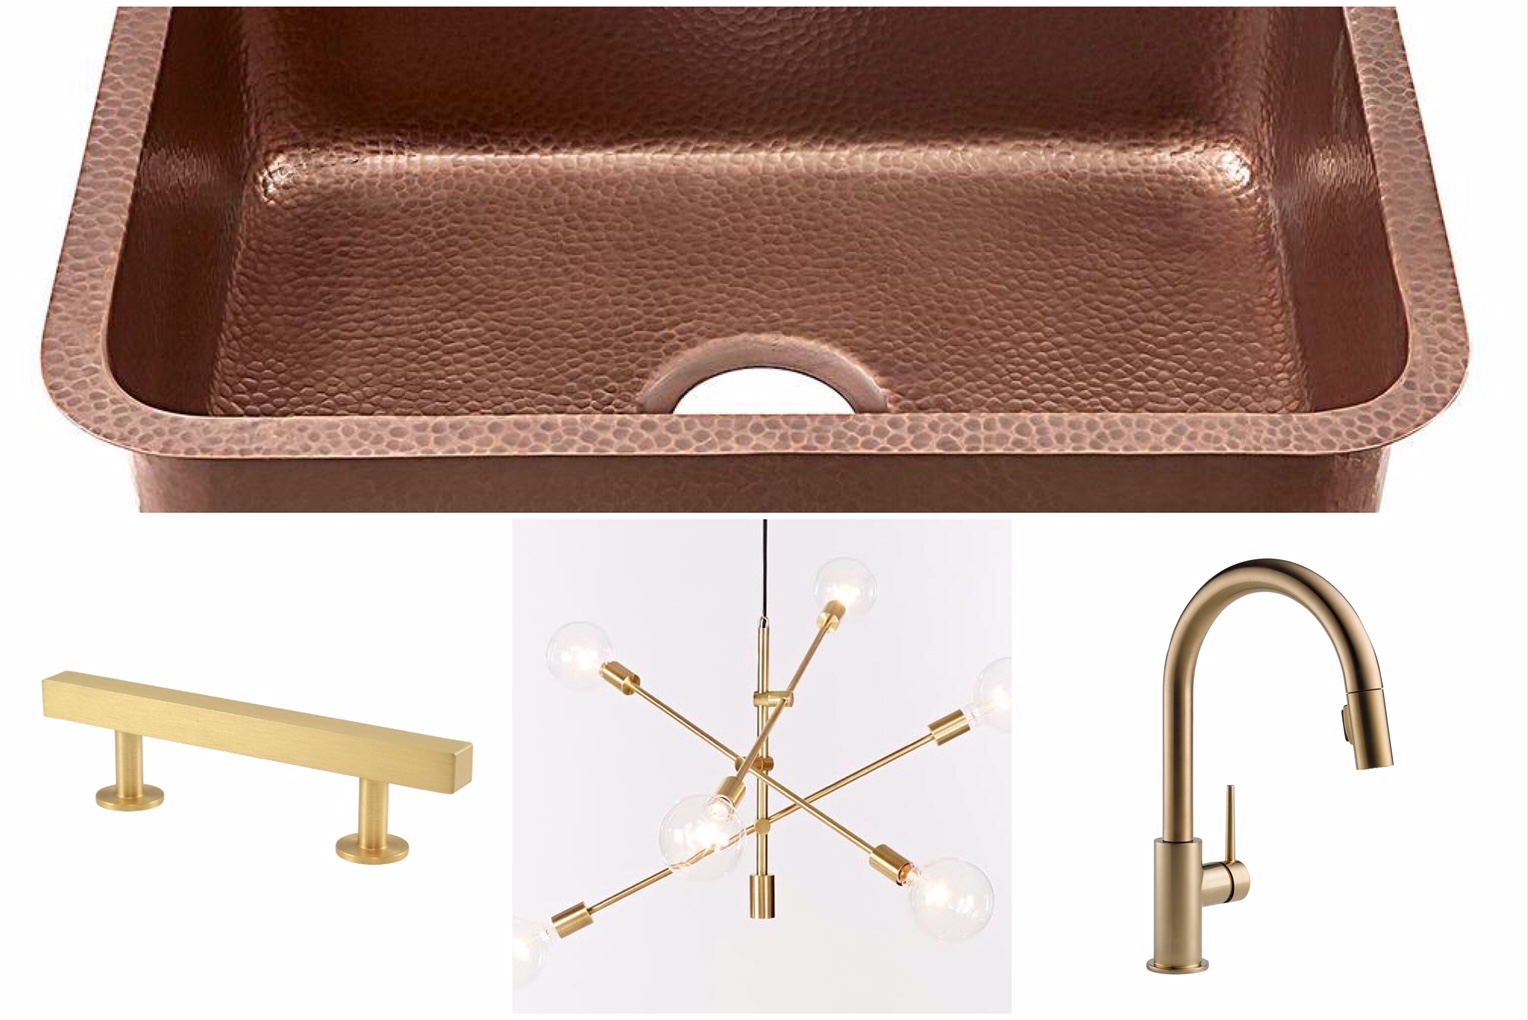
Copper and Brass in my house?… Who knew?
Fixtures – Splurged and Saved:
We are mixing metals, starting with that fancy copper sink ($299) which isn’t actually any more than a quality stainless steel sink, and a fancy faucet ($400) which is only more because of the finish, but only slightly extravagant compared to those fancy $800+ brass faucets I am in love with. Other finishes include the brushed brass cabinet hardware at about $12 a pull, LED under cabinet lighting ($300), and our brushed brass chandelier I scored from West Elm ($130 after discounts and gift cards) All told, fixtures and related stuff is expected to add up to about $1,800
![OMG! Is this Beadboard not Sexy? Utilitarian yet elegant and chic all at once. [<i>Source: <a href="“http://www.devolkitchens.co.uk”" target="“blank”">DeVOL Kitchens - UK</a></i>]](https://halfclassicsix.com/wp-content/uploads/2015/12/DeVOL-Kitchen-Beadboard-Sage-e1450576585560.jpg)
OMG! Is this Beadboard not Sexy? Utilitarian yet elegant and chic all at once. [Source: DeVOL Kitchens – UK]
We planned for the better part of a year to go with subway tile on the walls, but after beginning to grow tired of seeing it over and over and over again, I switched things up and we changed to 5/8 poplar beadboard walls. We will be running the beadboard up behind the cabinets on the sink wall for added structural integrity which will drive the cost up a bit higher, but in the end, the walls will be fabulous. As with the beadboard, the baseboards and trim molding will also be made of poplar, an affordable hardwood. All together the beadboard, baseboards and trim moldings will cost about $1900 (not counting primer and paint)
Electrical and Plumbing – Lucked Out:
Not a lot to say about it…. Keeping things in their original locations makes things a lot easier. But minor updates are necessary and we expect things to go smoothly. I would add that this is often not the case in New York City, especially Manhattan where even minor plumbing and electrical can run into the thousands. Here is where we lucked out. Together the Electrical and Plumbing are estimated to come in at about $1500.
![Our amazing soon to be kitchen floor: "Gypsy" in Black and White from [<i>Source:<a href="“https://www.villalagoontile.com/gypsy-black-and-white-encaustic-cement-tile.html”" target="“blank”">Villa Lagoon Tile</a></i>]](https://halfclassicsix.com/wp-content/uploads/2015/12/Gypsy-Black-and-White.jpg)
Our amazing soon to be kitchen floor: “Gypsy” in Black and White from [Source:Villa Lagoon Tile]
No hiding the fact that this is our single big luxury item. And luxury it is… By the time it is installed, our 170 square feet of heart singingly glorious flooring will end up costing nearly $8,000. Yep, that’s right, EIGHT THOUSAND DOLLARS. A lot of money for us, but sometimes you just have to find a way to have what you want, and so far we have zero regrets, even though it hasn’t been installed yet. (The tiles were delivered a couple of weeks back, and every time I pass the boxes stacked in the entry gallery a smile comes over my face when I think about how amazing they will be).
So, that is the budget at a high level. I am sure there will be adjustments along the way, and ultimately we may go over by a few grand. But when I look back to 2014 when we moved in, I had envisioned my dream kitchen, and estimated in my head that it would be 50k or more. This was why we initially decided to just go with a temporary kitchen and do the dream kitchen in five or so years. But after some research and with careful planning, we will end up with an almost dream kitchen for only $30k, which is far lower than many of my fellow Manhattanites spent on their smaller 7 x 9 foot kitchens. Funny thing about it, all of this extra planning has resulted in what I believe will be a better kitchen than I would have ever dreamed of back in 2014.
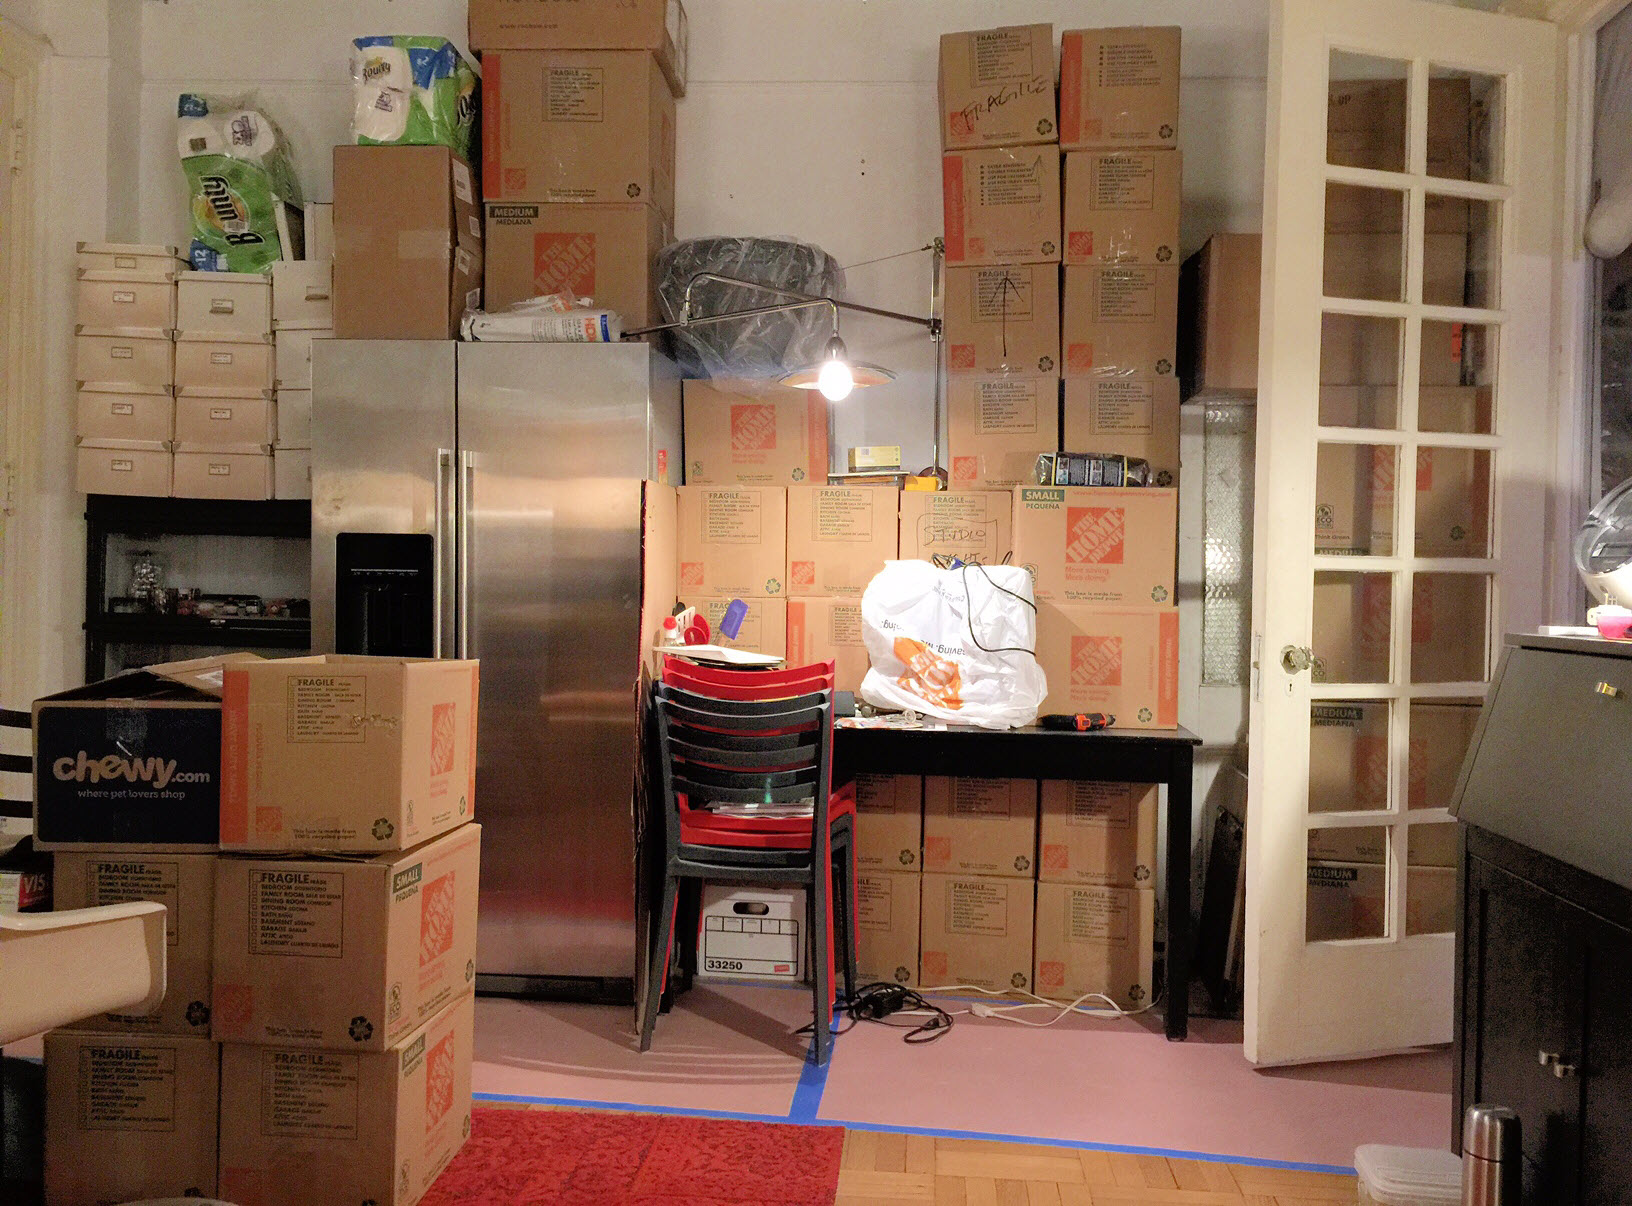
This is our living room as of Valentines Day. All of the art is safely tucked away, and the contents of the kitchen now take up much of the living room. A far cry from this image from last April.
Now it’s gotten real….. The action of demolition has begun, and our lives have been turned upside down and inside out… Expect pictures and updates soon. As chaotic as it already is, patience will have its rewards in the end. If all goes well and my plans pan out as I hope, by the middle of April, we should have a functioning (not finished) kitchen, and by the end of May it should be amazing.


March 29, 2016
Hi Devyn,
I found your blog via a post on Pinterest. I have pinned many of the same pics you included in your blog. Deep blue cabinets, copper sinks, brass accents, simple British cabinet designs like Devol, and maybe Ikea and semi-handmade doors. So I was very curious about your Barker cabinets, and after seeing your floor tiles am beginning to think about something similar. Can you tell me how the rest of the flooring in your apt ties in? I’m just at the beginning of planning our much need kitchen reno for our small home in Toronto, that was built in the early 1920s. I love your choices and can’t wait to see pics of the result.
Wishing you and Yoav continued energy, strength, and many years of enjoying wonderful meals together.
March 30, 2016
Hi Sharon,
Glad you found me! I really need to do more with Pintrest, but can’t ever seem to find the time. 🙂
The Barker Cabinets…. I love them… So far.
We are only now in the stage of beginning to paint the cabinets, and I will admit it is a lot of work, but I have no doubt they will be wonderful. As I have been working with them, the quality keeps coming through. I will say that because they are solid wood (plywood and maple), they are heavy! OMG so heavy! But that only tells me that they will last. Also because they use Blum hardware, which is the gold standard of cabinet hinges and drawer mechanisms, I know that I can obtain replacements should one of them eventually fail.
The thing I love the best and am most excited about is the fact that we were able to completely customize them… In height, width, and depth. This makes all the difference in the world. Being able to determine cabinet widths down to the quarter inch is remarkable (thanks to computer technology). We added three inches of depth beyond the standard upper cabinets which will make for more storage, we also added two inches of depth to the base cabinets creating extra counter space.
I am amazed that Barker doesn’t have copycats out there. There are lots of other RTA (ready to assemble) cabinet companies out there, but every single one I have come across only sells their cabinets in predetermined sizes, and any customizations come with huge up-charges. Barker is limited in finishes, but I am thrilled to be able to mimic by beloved British Kitchens (which I will be doing by added additional wood pieces between the units to create the illusion of inframe cabinets).
As for the floors…. We are blessed with beautiful quarter sawn oak parquet floors, original to our 1910 apartment. We had them refinished before moving in, and they are in amazing condition given their age. Here is a post I did about them just before we moved in: https://halfclassicsix.com/the-floors-are-beautiful/
The bathroom has 8×8 black tile from what we would guess is the 1980s or 90s, not my choice, but it could be so much worse. When the installed the bathroom tile, the also did a black stone saddle in the doorway to transition to the wood. We had a black soapstone saddle made for the kitchen doorway with the new floor to match the adjacent bathroom door. It has turned out very well, and was well worth the $250 spent for it. When we eventually re-do the bathroom in a few years (after the kitchen is paid off), we will likely either retain or replace the bathroom saddle with the same thing.
The cement tile was truly a very extravagant splurge, but when we factor in the fact that I am doing the majority of the labor elsewhere and saving on that cost, we have zero regret over spend a fortune on the floor. It is and always will be a source of joy.
Thanks again for commenting,
Feel free to ask, I will always to my best to answer.