
This is the fifth and final post in my series The Final Kitchen Plans–Finally. In Part I, I talked about the evolution of our final plans into using materials we never considered. I also recapped my previous post on choosing the floor that made our hearts sing with joy, and touched on our plan to go with beadboard walls instead of the herringbone subway tile I had been planning for the previous six months. In Part II, it was all about cabinets and countertops, how we ditched IKEA cabinets when we found a better solution and decided to defy the naysayers and go with white marble countertops. In Part III, I wrote about my new found love for warm toned metals such as brass and copper, finding that they can be mixed with the stainless appliances and still play nice together. And in my last post, Part IV, I revealed my lighting plans, from under-counter options to traditional over the sink lights and finally the chandelier. And now Part V, my last in this series… The final floor plan, the layout of the kitchen, my until now, very rarely mentioned studio/workspace, and how we got here.
The challenge: Fit a kitchen into a former bedroom while providing office/work-space for Devyn
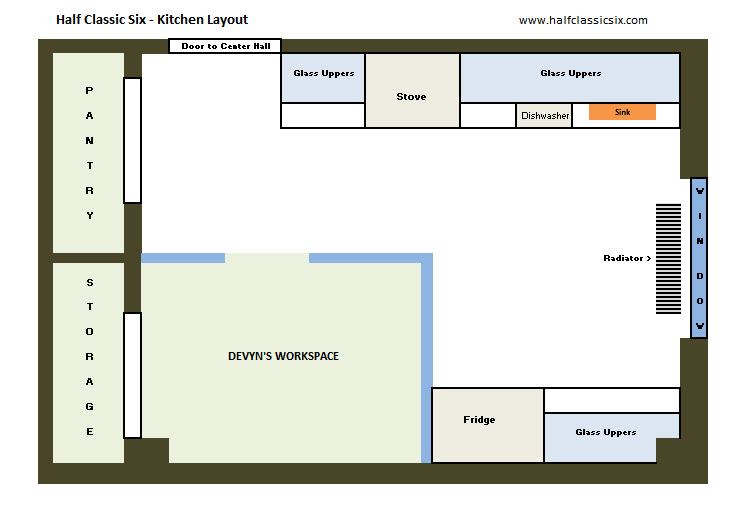
Overall Layout:
Let’s start at the beginning. First, our kitchen is not original to our apartment. During the middle of the last century, our apartment which was originally a 1,300 square foot classic six (living room, dining room, kitchen, maids room, two bathrooms, and two bedrooms) was cut into two apartments. The original kitchen was located in what is now our neighbor’s apartment. Our kitchen is located in a former bedroom, which explains why we have an 11.5 x 13 foot kitchen with two closets. Keep in mind, the average Manhattan kitchen measures 7 x 9 feet making our kitchen quite large. In real estate terms, this would be called an eat-in kitchen, and for most people it would be, but not for us. At least that is not what we plan to use it for.
Back when we were schlepping through the more than 50 open houses looking for our dream apartment, one of the requirements which developed over time was to have enough room to create a studio/workspace for myself. I need a place to tinker, be creative, do art, etc… A space where I can make a mess, and then “close the door”. We had hoped to find a true two bedroom apartment, but the realities of Manhattan real estate provided very few which were within our price range, and when they were, they were places neither of us would want to live in. When we came to the open house for our place, I didn’t initially see where we could carve out space for myself, but my amazing (yet spatially challenged) husband saw the potential in the giant kitchen, and at the second showing, we confirmed that there was indeed enough space to carve out a studio/workspace for myself. Even better, my work space has its own closet. But more about my studio/workspace below later.
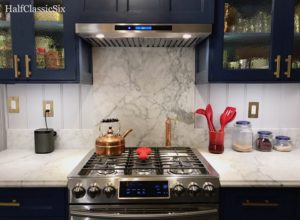
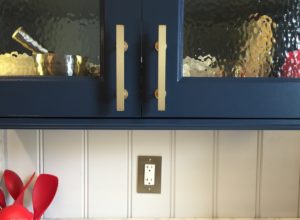
Pretend the brown cabinets are actually Stiffkey Blue, and envision white marble countertops, and this comes close to the final plan for our sink wall.
So, even with my studio/workspace taking up a quarter of the space, this still leaves us a pretty large kitchen. But not without its own limitations. This is where the challenges come in. You saw the image above in my post about Finding a Unicorn in the Hood. I, of course, didn’t elaborate cause I wasn’t quite ready to fully reveal the plan, but basically, this is how the sink wall will look (above), only the cabinets will be Stiffkey Blue and the countertops marble, but the placements are bang on. This doesn’t look so complicated, right?
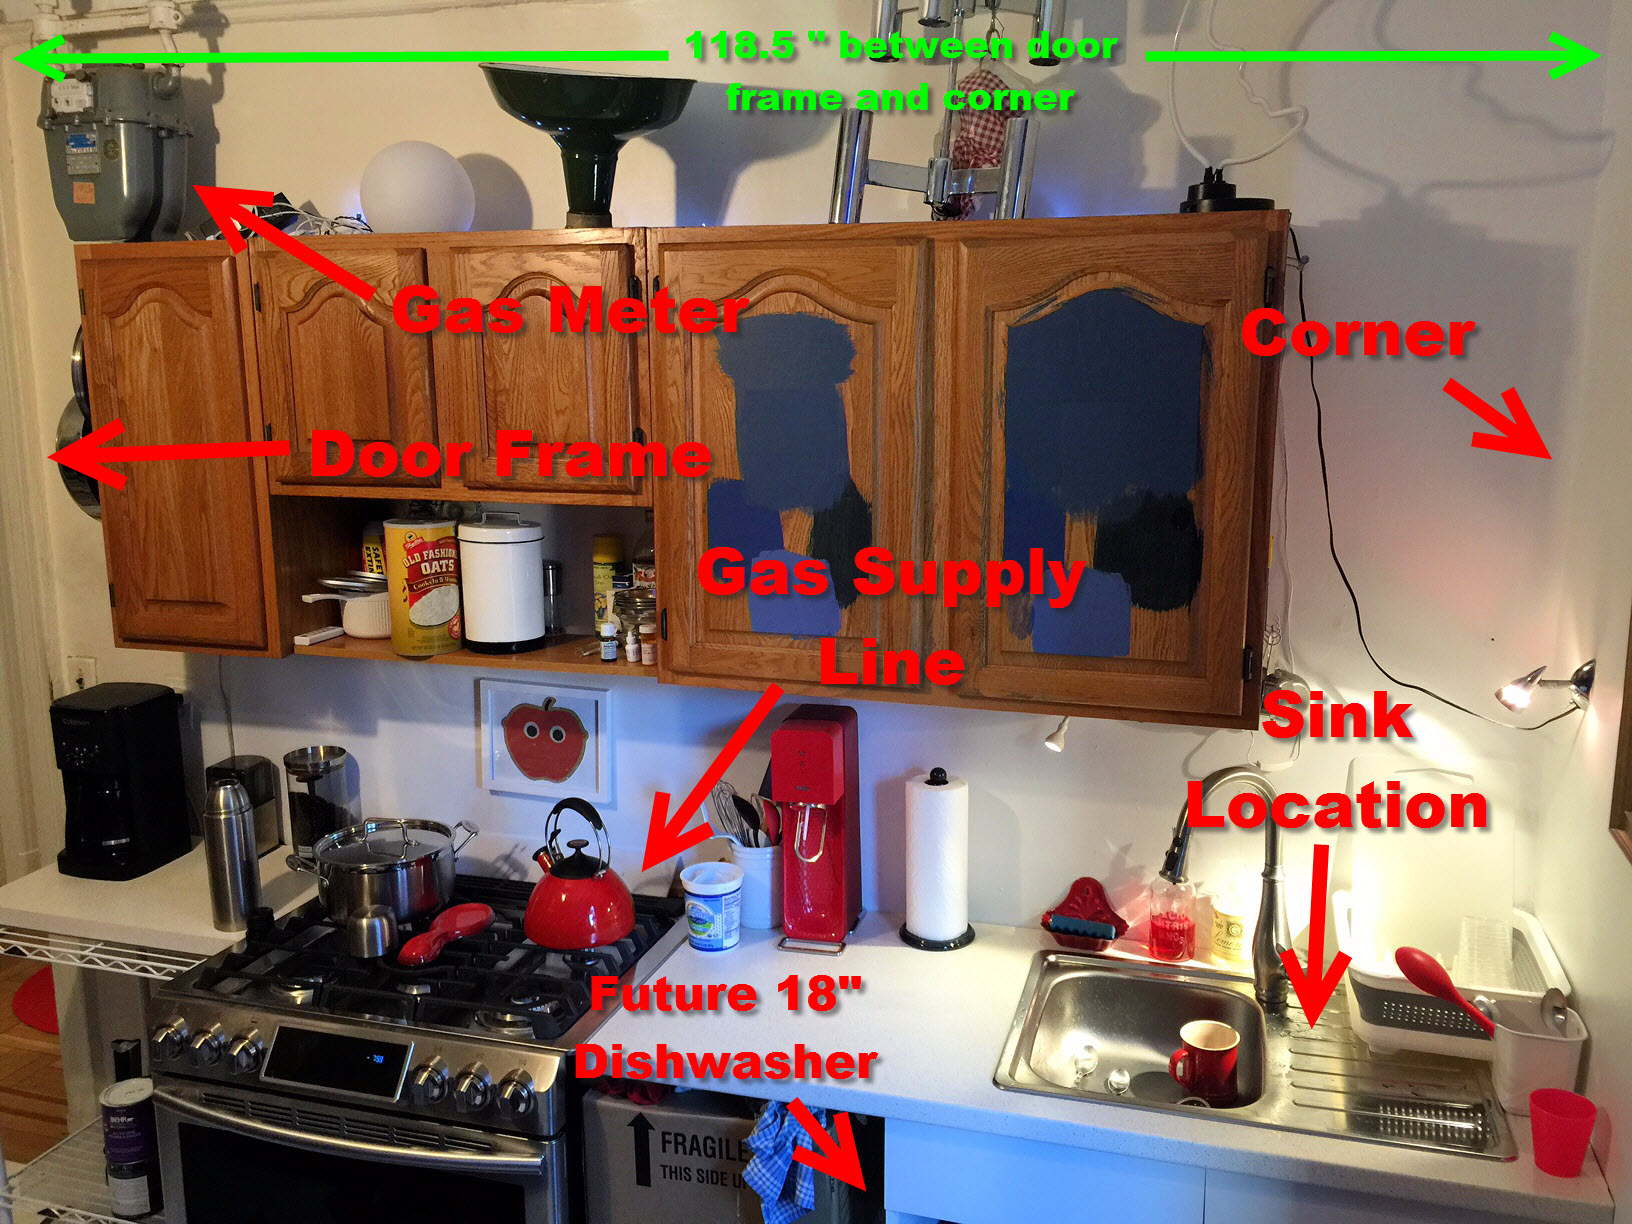
Our current and very un-glamorous kitchen as seen one morning this week. The limitations of this 118.5″ space are very real and more complicated than they should be.
Well…. In my post “Rethinking the Kitchen” I detailed the complications of the sink wall. The 118.5 inches of space is a nice amount of space to work with, but there are lots of obstacles to manage. Primarily this includes the gas meter mounted high up on the wall to the left of the stove (which will be hidden inside of the upper cabinet to the left of the stove), as well as the unchangeable locations of the gas and water supplies. To keep things simple with our buildings requirements for alterations, we chose to not change the location of the cabinets and appliances, they are only being replaced. This will also save on architect fees and unnecessary headaches.
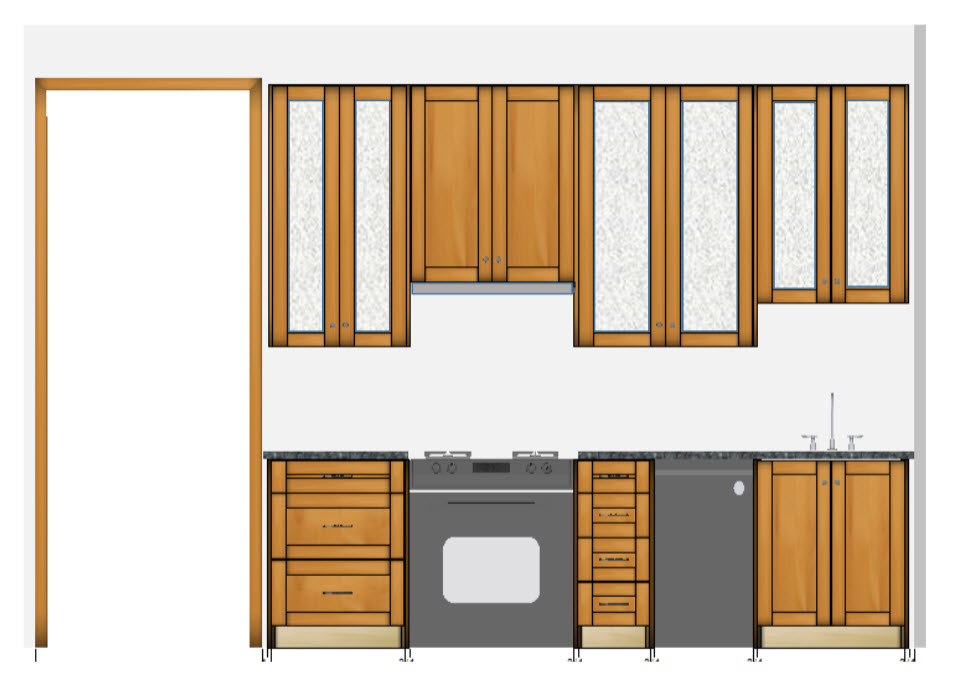
This is the not so accurate view of the far wall in our kitchen plan. I say not so accurate in that these objects only represent the shape and location, but not the aesthetics in any way. But it gives an idea of what I am doing.
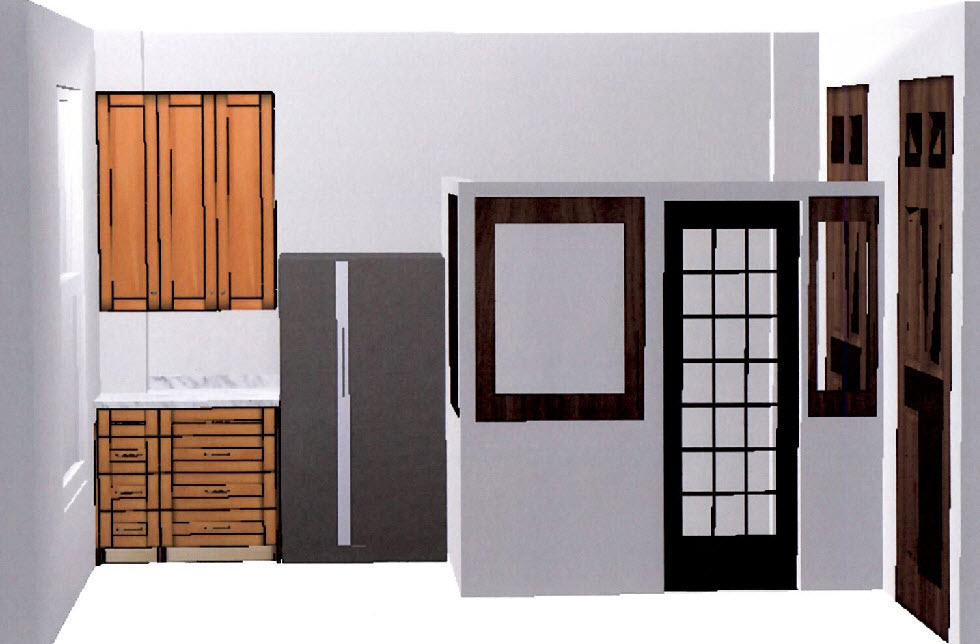
On the opposite wall, tucked between the outside corner and my studio/workspace there will be additional counter space with the microwave hidden below, a very tall glass upper cabinet above, and the refrigerator with butcher block shelves above it. This will be a tight squeeze because in the corner, there is a bump out to accommodate steam pipes. Again, one of the huge advantages of using Barker Cabinets was the ability to custom order shallow cabinets to fit in the corner where the steam pipes are buried, yet both the top and bottom cabinets will be flush with their adjacent ones creating the look of a single unit (the upper in the corner is only seven inched deep). The corner cabinets are only about 40 inches wide because Yoav and I had to have the huge side-by-side refrigerator neither of us have ever had but always wanted (with in-door water dispenser! Woo Hoo!). Our decision to go with the side by side left us less room for the cabinets, but either way, had we gone with IKEA cabinets, there would have been zero upper units because they had nothing that would fit in the space (again, thank you Barker!)
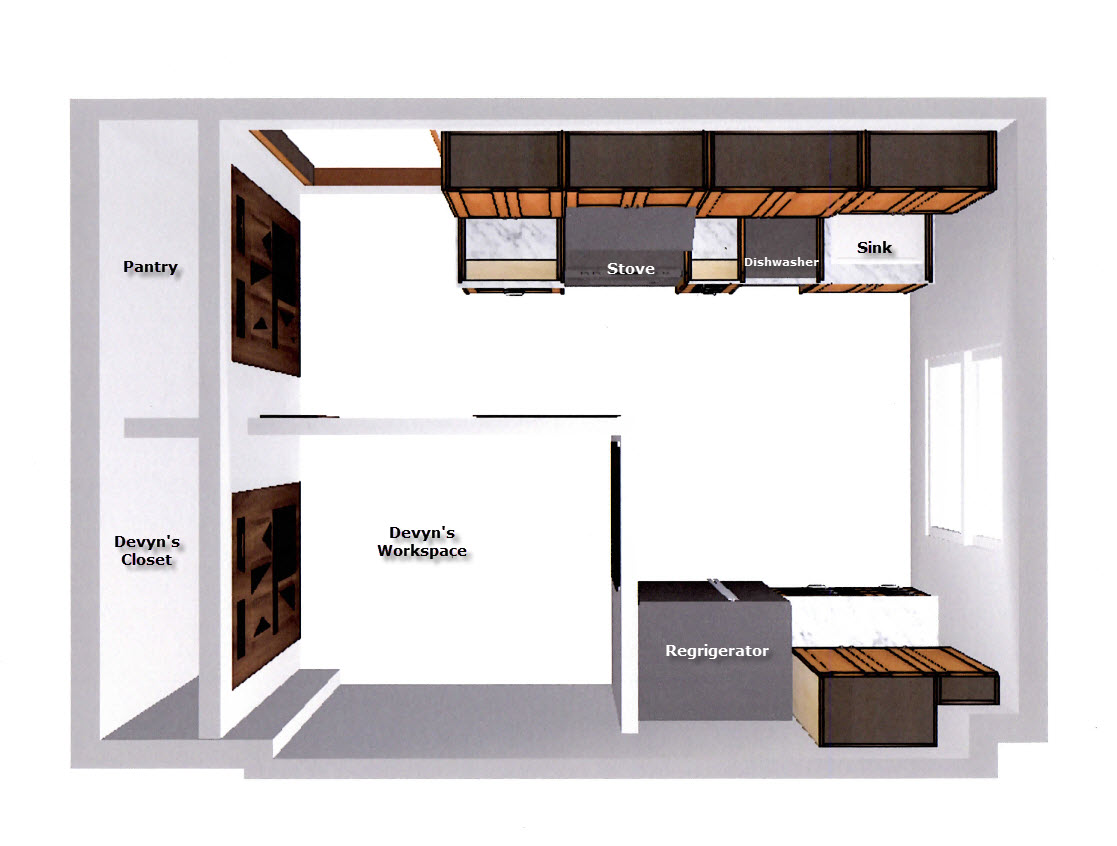
This birds eye view clarifies the location of everything, but looks nothing like the final product will look in terms of color and materials.
So from the vantage point in the image above (ignore the fact that all the textures and colors are wrong, but the layout is correct) you can see how we will end up with an “L” shaped space and a pantry. Because of the amazing flexibility in customizing the cabinet sizes (again, thank you Barker Cabinets), I made the best use of the space by making all of the cabinets between two and four inches deeper than standard kitchen cabinets are. This will add a sizable amount of storage without compromising the feeling of being in a good sized space.
About that Studio/Workspace:
I haven’t really written much about this part of the kitchen plan (it was briefly mentioned in an early post in June of 2014), but it has been part of the plan since the very beginning. As noted above, I will do a full post about it, but here is an overview of how this will fit into the kitchen as a whole. I will be carving out my approximately 40 square feet (space plus closet) of space to declare as my own space. Aside from being a fantastic blogger (Um, yah, right?…) I am also an artist who has lacked space to create for a very, very, very long time (1999 to be exact). I still create things, but I have been limited in that I hate to make a mess in my regular living space. I hope to utilize this space to pursue my artistic endeavors such as painting, writing, and various other things artistic people do as well as a place to store my growing collection of power tools. Basically, this will become my urban version of the proverbial “man cave” in the city.
This is the type of partition wall I envisioned… Only smaller scale, with textured glass for privacy, and less ornate. But you sorta get the idea… right? Trust me, it will be amazing.
The plan for the structure for my space has been formulating in my head for the past 18 months. Think cubical, but from 1900. I’ve had a picture in my head of a turn of the (last) century office space where partitions were built incorporating raised panels on the lower section and textured privacy glass on the upper portion. So that is the vision that’s been floating in my head for my studio/workspace. To make that vision a reality, I plan to build a partition wall about seven feet high (leaving nearly three feet open above) framed in 2×3 poplar, with raised panels on the lower portion and textured glass on the upper portion to allow as much light as possible to fill my space. Part of this plan included a unique door to use to close the space off. I was hoping to find a vintage door with glass panels, but finding vintage anything at a price that is affordable in New York City is nearly impossible. I know that if I was most anywhere else in the country, I would have no problem locating a door, but not here, and definitely not in Manhattan. But then I found this on the Internet…
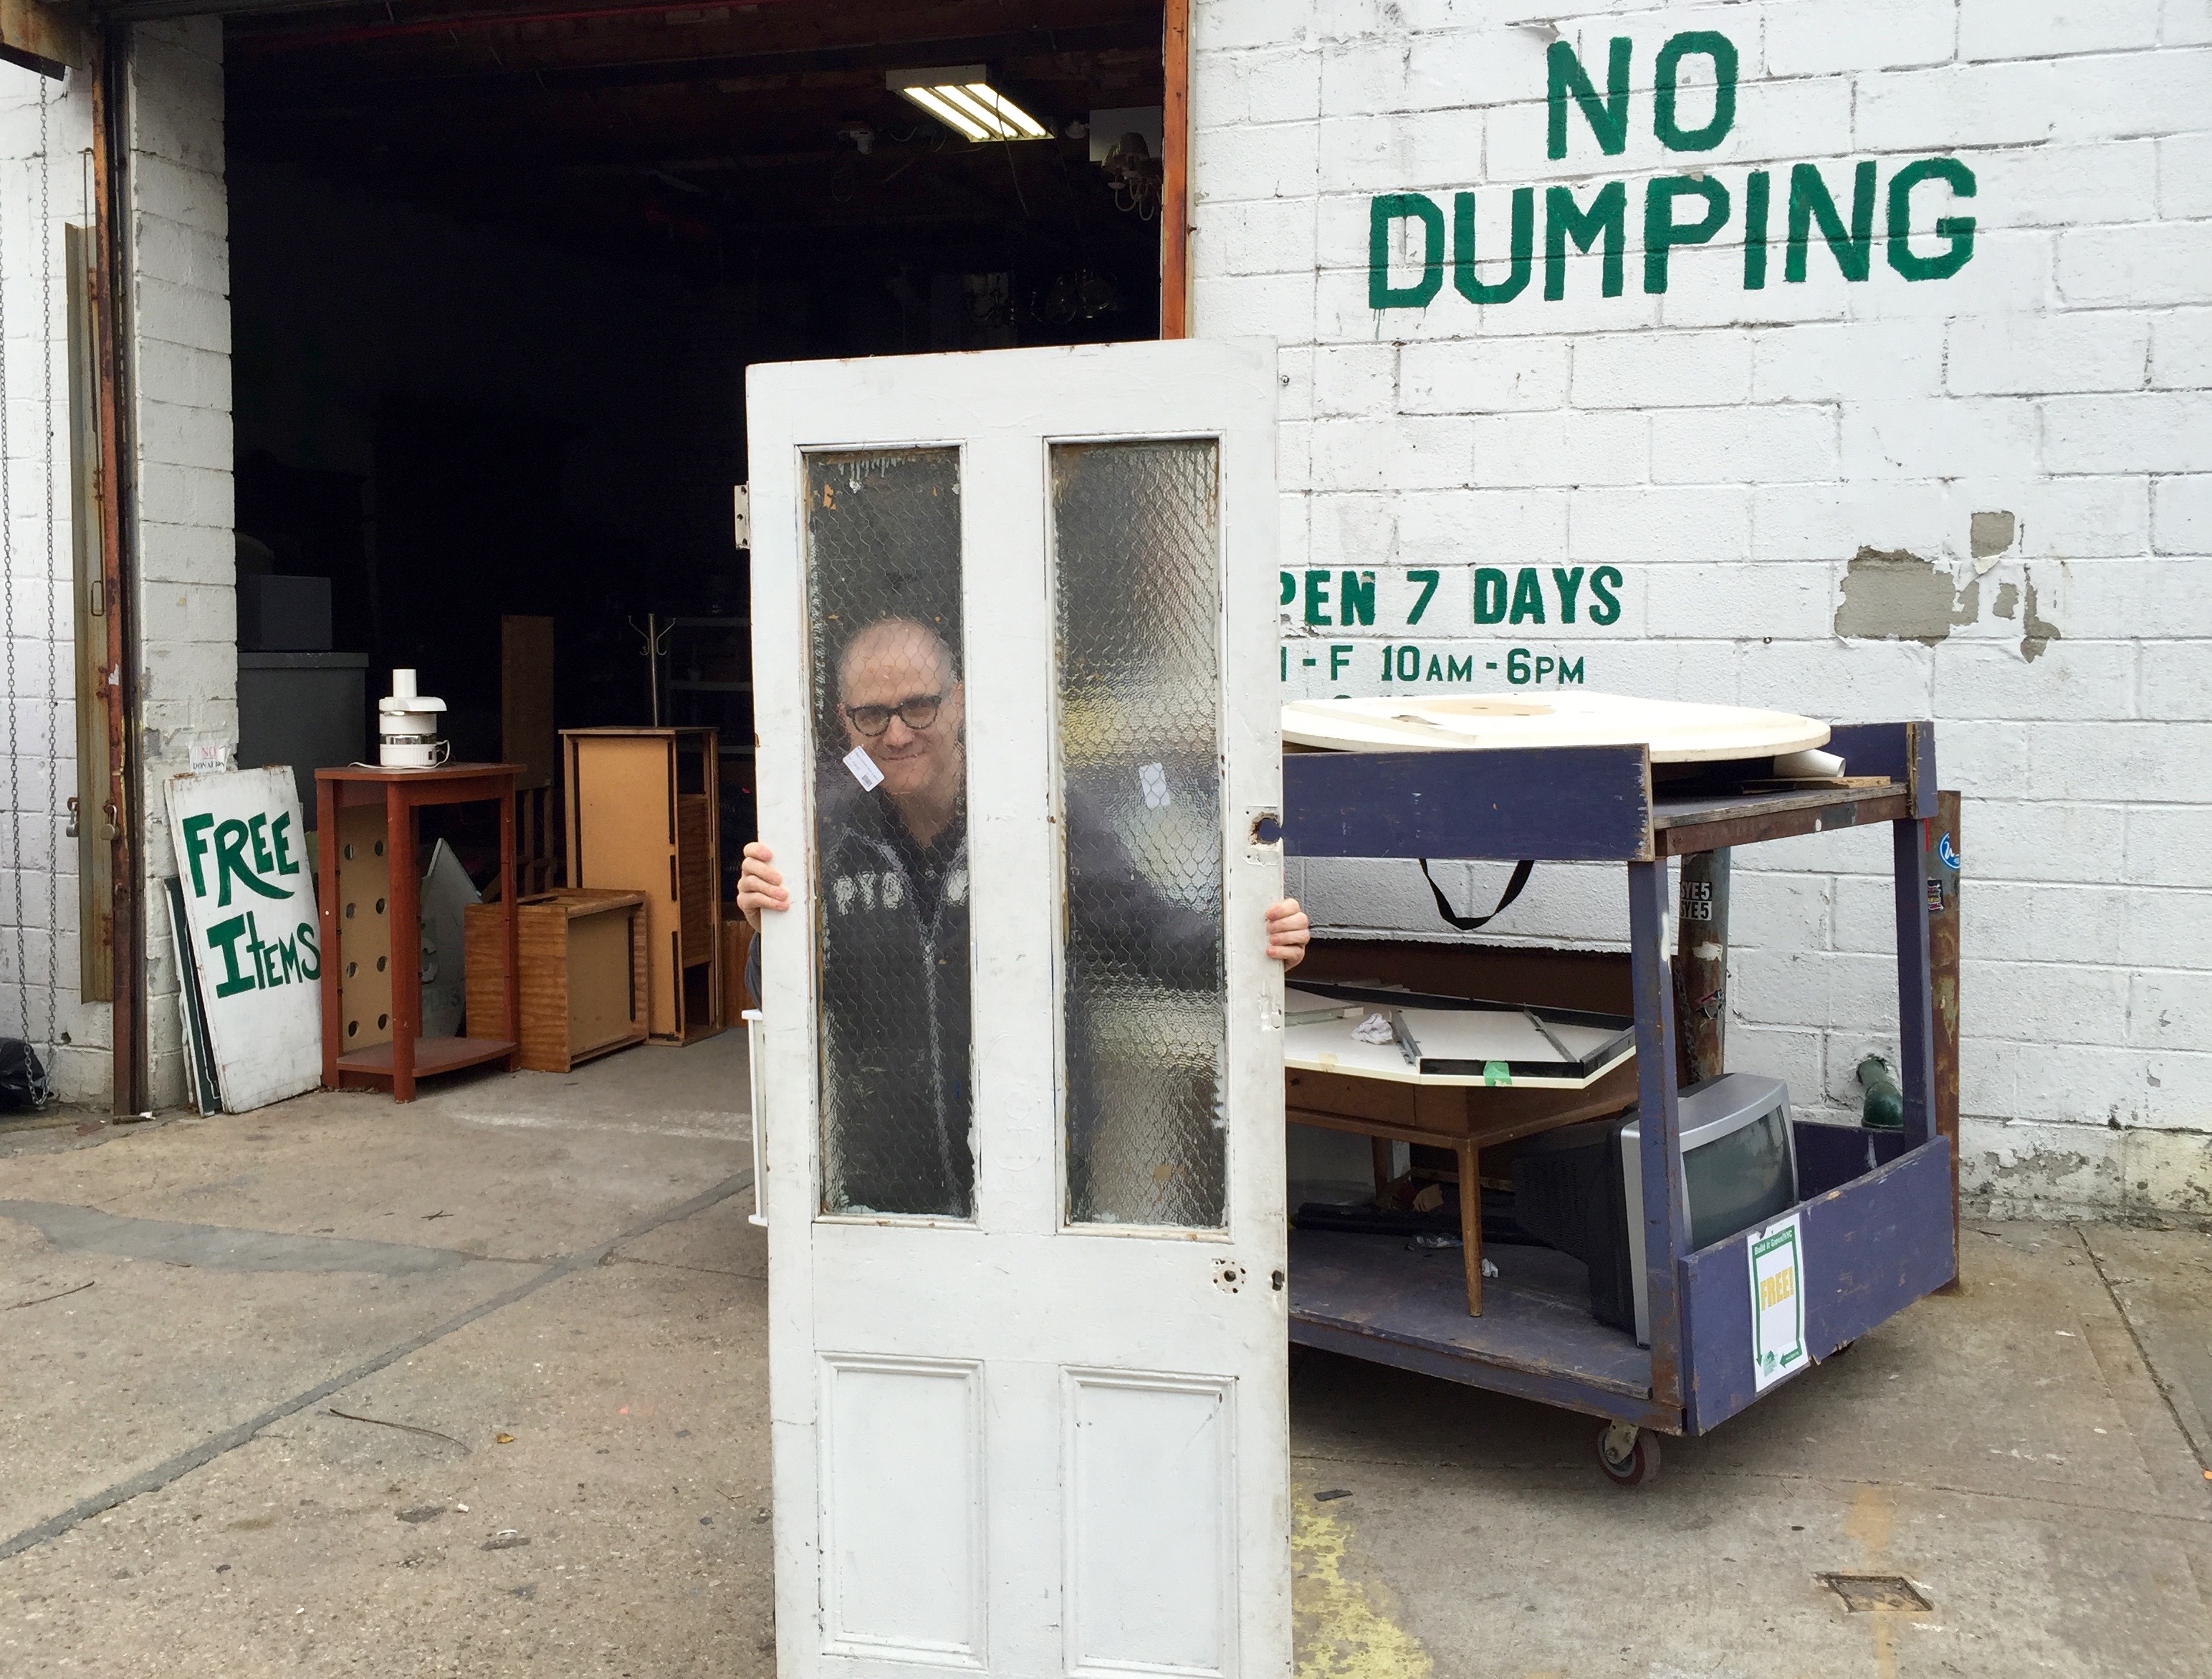
My handsome husband is holding the vintage door with awesome chicken wire safety glass we found at BIG Reuse in Astoria.
What can I say? Thank you Internets?!?! Last month, I stumbled upon this door on the BIG Reuse website. It was at their Astoria location. Two days later, Yoav and I were schlepping out to the outer edges of Astoria, about as far from the subway as you can be and still be in Astoria and it took only a few minutes to find this gem of a door. At less than $200, this is considered affordable by NYC standards, and by my standards, it was not too bad. It is in rough shape though, it has been cut down from its original size, and I will need to do a lot of work to make it look great… But I was immediately in love with the vintage textured chicken wire safety glass. And as it turns out, this pebble texture is nearly the same as we had already chosen to use for our kitchen cabinets (sans chicken wire). Perfect! I plan to mount it on a track to keep it from taking up valuable space both inside my work space and outside in the entry area to the kitchen.
For those who are thinking…. This is not going to be good for resale…. No need to worry. Although we have zero plans to sell in the next 25+ years, the partition can be removed, and with little effort, the space would suddenly return to being a very large eat in kitchen. This of course would pay off in more $$. But until that day comes along, it will be our dual use space.
Also for those who are thinking… What about a space for Yoav? Where is his space? Well, he made it clear pretty early on that separate space for him isn’t very important, at least not in the same way it was for me (God bless him!). The thing is, I wasn’t actually thinking about a space for me either, but early on, we went to one open house where they had closed off a small 8’x8’ dining area with a window into an office and very quickly the dream of having my own studio/workspace became a requirement. I don’t have an actual window, but the textured glass will help a lot.
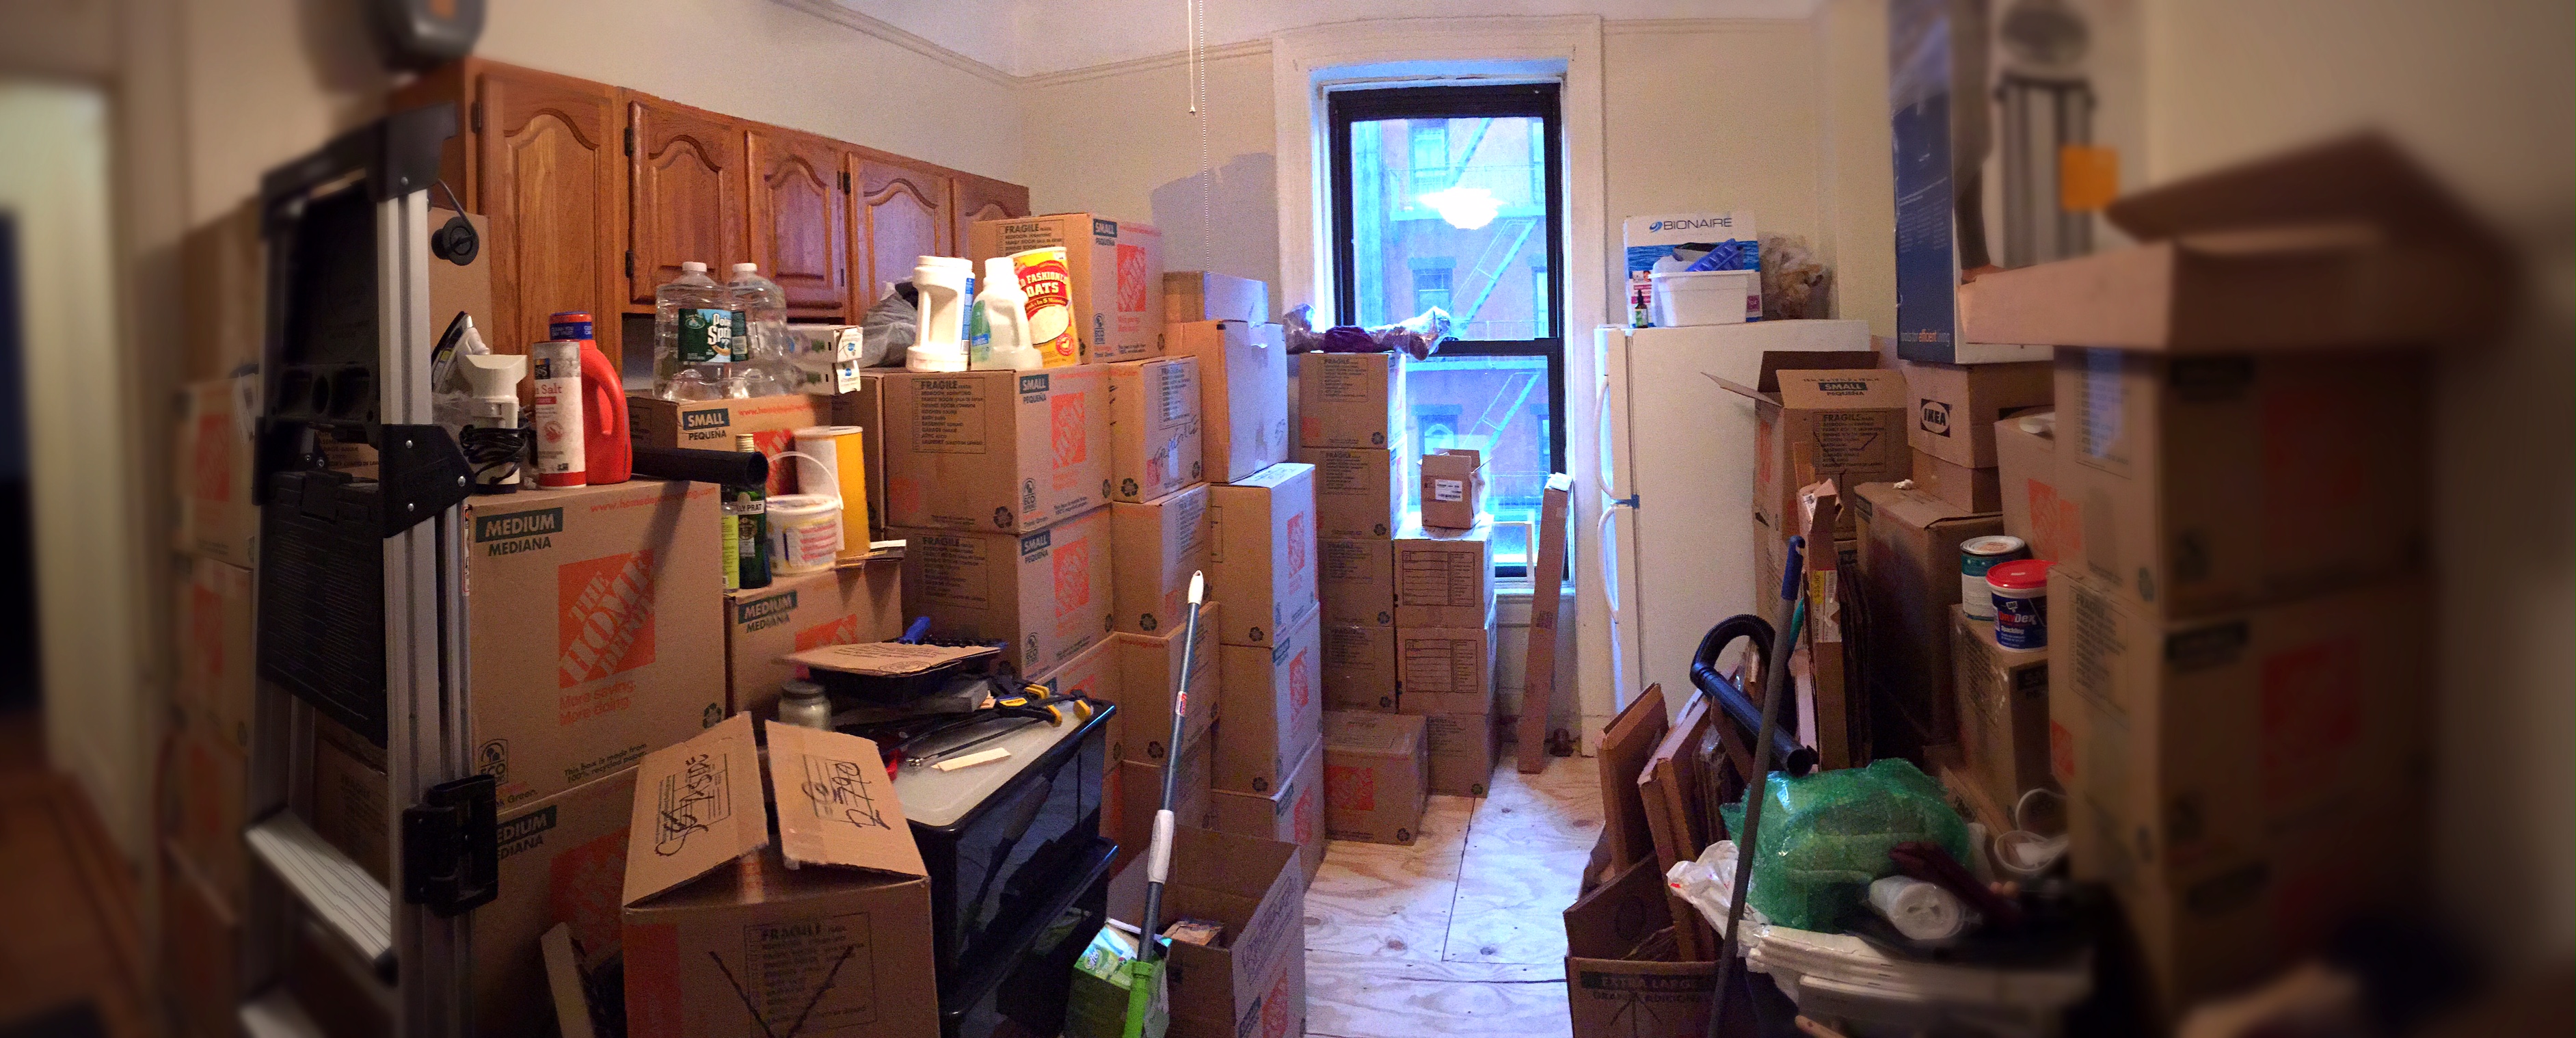
Our kitchen back in October 2014. You can see we were going for an urban storage locker look…. And succeeded! We will now be re-entering the land of living in chaos…. But it will be worth it.
So now we have the official floor and cabinet plan… And my studio/workspace, which until now has been hardly mentioned, will finally come to fruition (I am so excited to finally get this!). That wraps up this series. I hope you have been mildly wildly entertained somewhat, and hope you will come back for more.
This weekend, the work begins… Emptying the kitchen will begin, moving all of the art to a safe location in the bedroom, wrapping our giant glass chandelier, and more! My next post will be the preparation for chaos. Going forward I hope to post weekly progress reports, dive into our budget, and do several detailed posts about crap you never even knew you were interested in (stripping paint anyone?). I also promise to show pictures of the chaos, because that is the only way we are going remember how hard this whole thing will be. Till next time!
This post is part of a series about our final plans for the kitchen remodel we are beginning in early 2016. You can view all of the posts in the “Finally — The Kitchen Plans are Final” series HERE.


Social