
Again the gap in time between posts is longer than I would prefer, but here I am with another useless tidbit about my complete and total obsession with details…
To catch up, I last posted about our making a major shift in plans by abandoning Ikea cabinets with doors by Semihandmade (sorry folks at SemiHandmade, not so sorry for the Ikea folks) for an entirely new cabinet option using Barker Cabinets instead. We ordered sample doors and this past weekend I put a shot of the two sample doors on the Facebook page to get feedback on whether we should go with the panel door option or the flat door option. The majority opinion was to go with the flat panel option, but we were not quite satisfied and ended up spending another $25 ordering another sample (which I hope is here by Thanksgiving weekend) to help us make the final choice. So that issue is still out there…. We are hoping to place our order for cabinets by the first of December (OMG, this sh*t is getting real!).
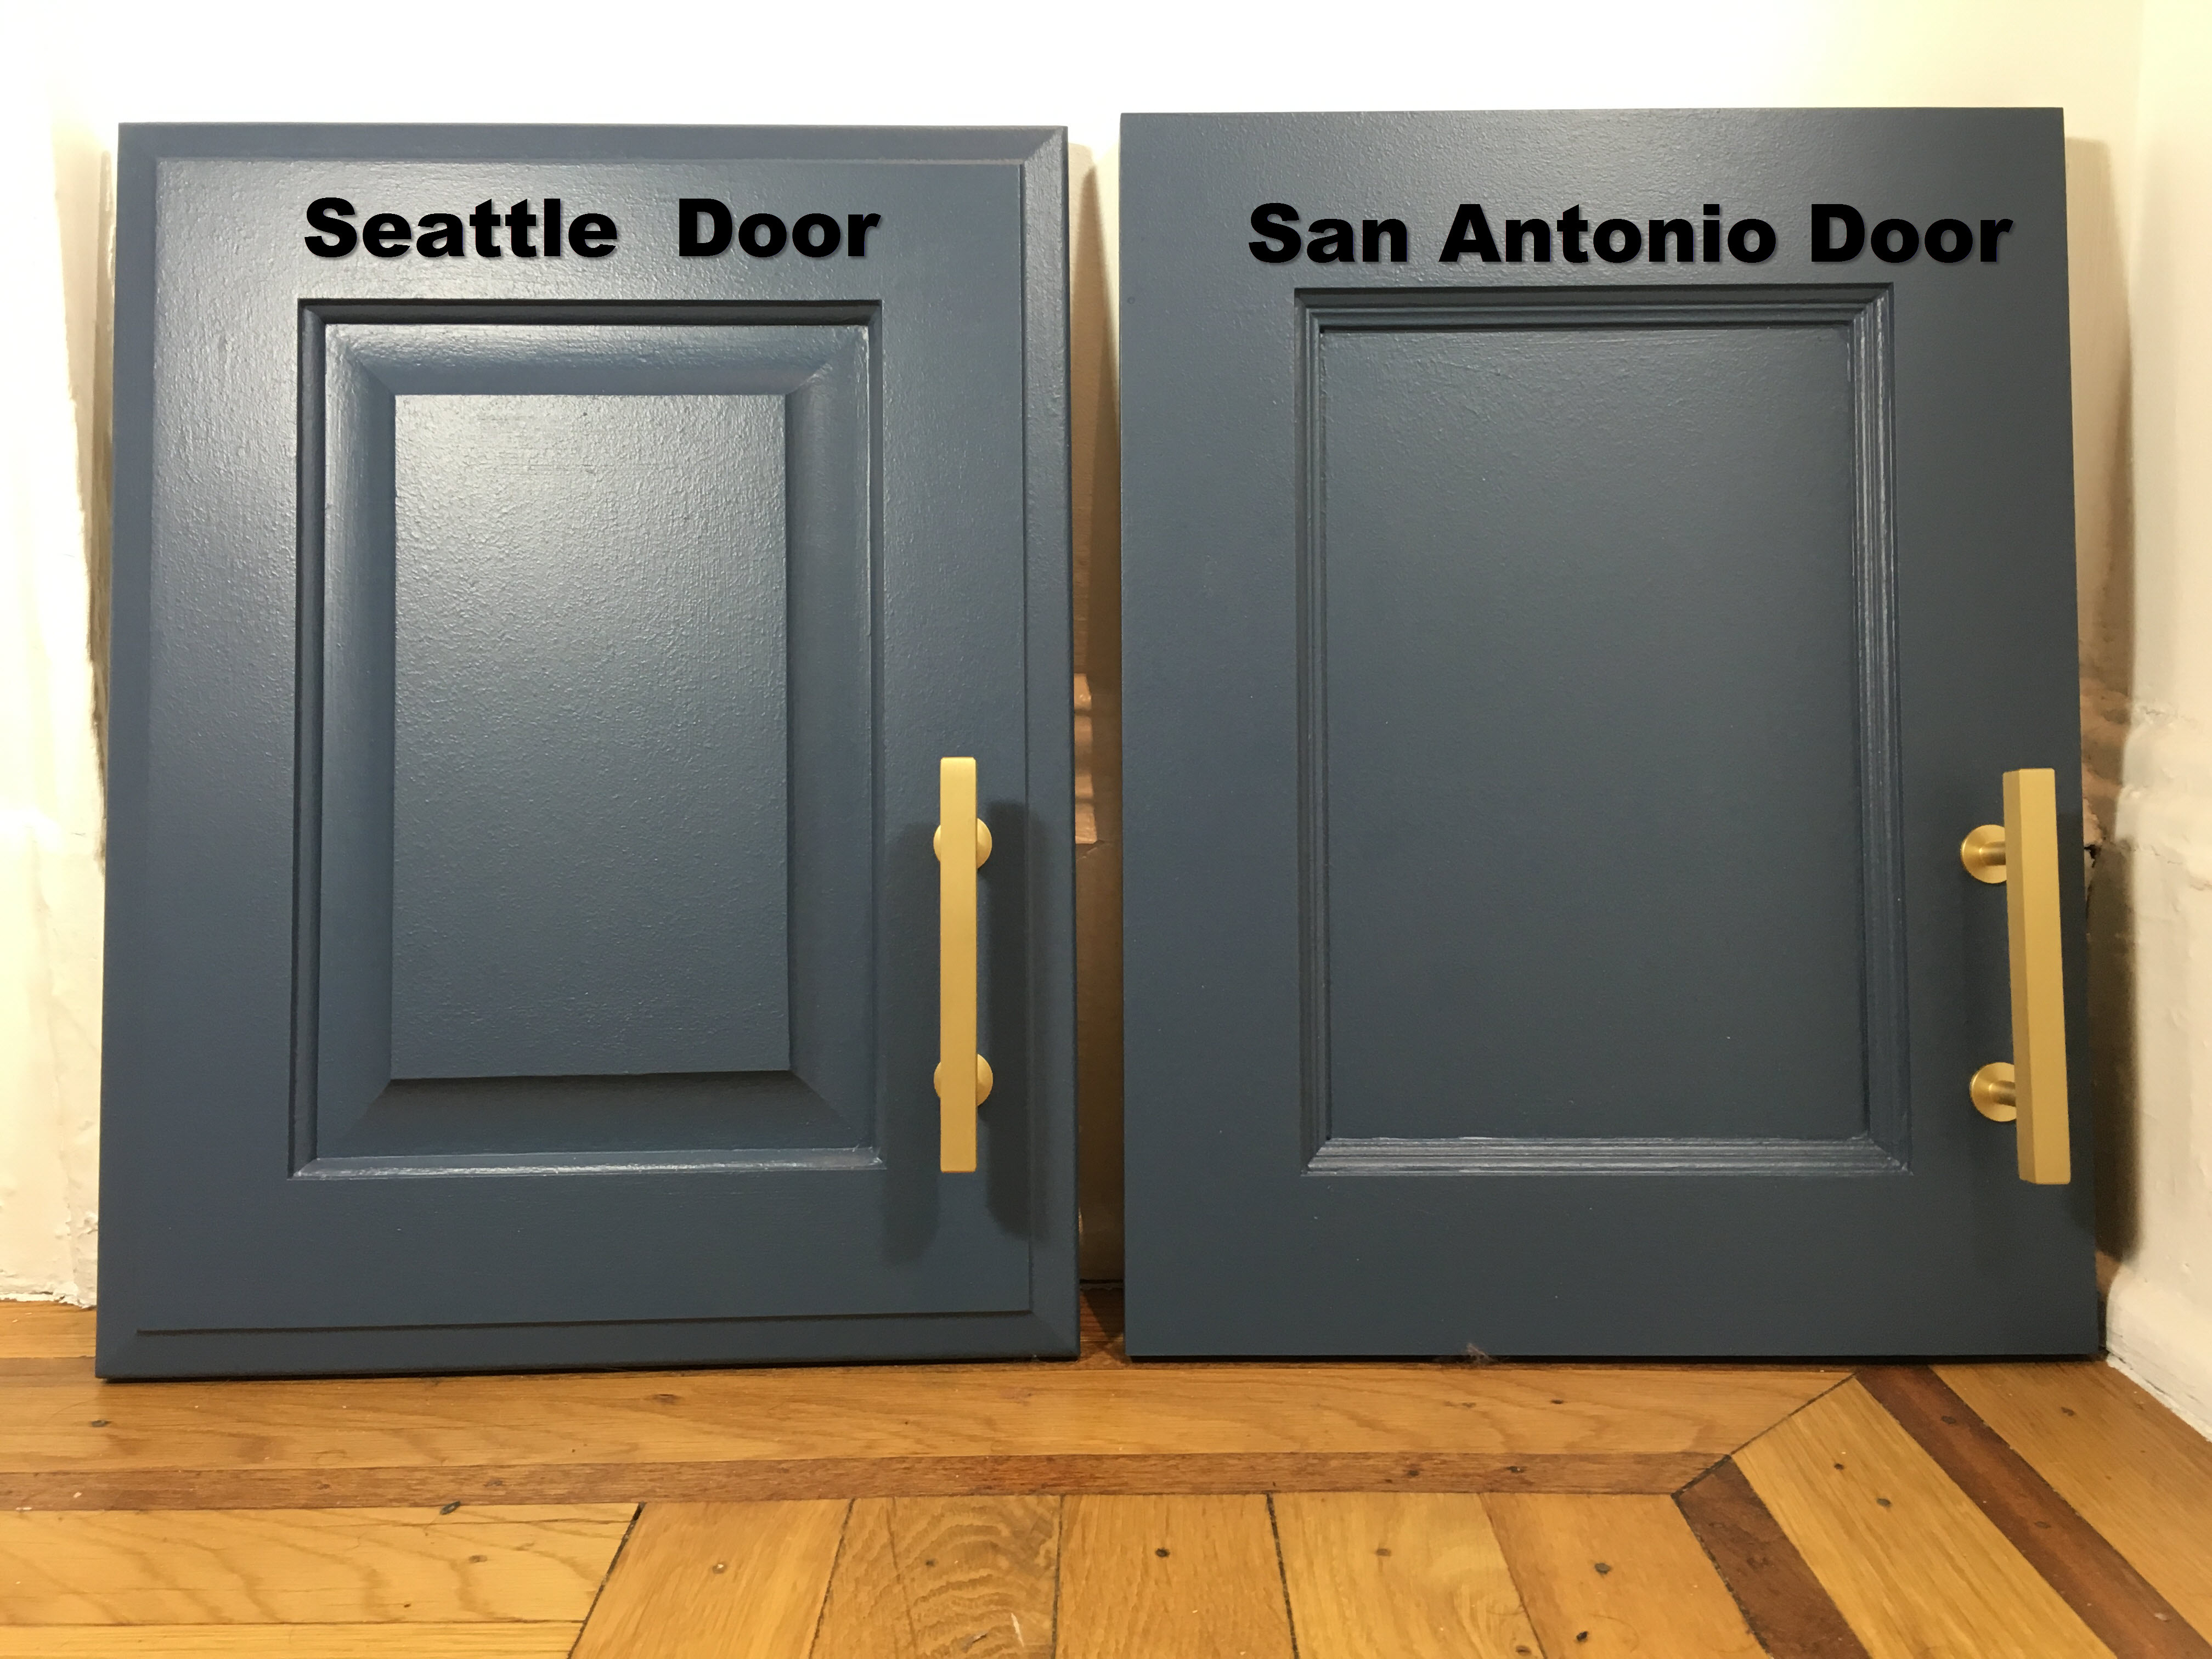
Our two sample doors from Barker Cabinets arrived. I have primed and painted Stiffkey Blue (which does not translate well in this shot) and added the Lewis Dolin hardware we plan to use. We like elements of both, but because we are still undecided, we ordered a third sample to see if we like it more.
In preparation for the cabinet order, I have designed, and redesigned, and redesigned again the cabinet layout using the kitchen design software that is available through Barker Cabinets (it is a 30 day trial download) and done multiple iterations. The tool has a definite learning curve, but the thing I love the most about Barker is that we have the freedom to order our cabinets in an infinite variety of size options. This means that our uppers can be 14 inches deep instead of the standard 12, and we can stretch them to 48 inches in height. It also means that our base cabinets can be 26 inches deep instead of the standard of 24 which will give us a bit more counter space (Woo Hoo for extra counter space!). The best part is that we can adjust the width of each cabinet in ¼ inch increments which is how we are going to squeeze in a set of drawers which will only be 13.25 inches wide (Top that IKEA… Oh wait, you can’t!). Oh, and I cannot forget to note that everything is made from plywood and solid wood, and like IKEA, they use Blum hardware (considered the best).
As I was reworking the design and making everything fit, I started looking into my plans for a range hood. Both Yoav and I feel strongly that we don’t want the microwave over the range as has been so common for the past couple of decades. We will place the microwave elsewhere. As for the style of range hood we are looking for? I would call it. “restaurant-ish”, in other words, we want a stainless steel range hood for a 30 inch range that has many of the qualities of a restaurant range hood, but scaled down to a residential size and application. I also must have built-in lighting and stainless steel baffles (grease traps) instead of the cheap feeling aluminum mesh traps found in most residential hoods. Oh, and one more thing… We need it to be ductless as the option to exhaust to the outdoors is non-existent in our building. . Ductless range hoods use charcoal filters and basically, “clean” the air after the grease is trapped and blow it back into the kitchen (including the heat). They are frequently found on over the range microwave ovens.
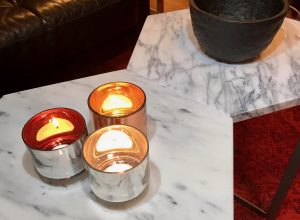
So, basically, we want something like this:

This is a beautiful example of the look I was hoping to achieve with a “Restaruant-ish” looking range hood. Alas, it is not to be.
Source: Hyde Evans Design
Isn’t that pretty!? I think so…. So the hunt for the right hood begins… What I thought would be a no brainer with LOTS and LOTS of options wasn’t so easy. It turns out that there are indeed many, many, beautiful range hoods out there that look like what we want, but it also turns out that our one additional requirement for it to be ductless is only slightly easier than if I was searching for a Unicorn.
To add to the frustration is the fact that Pro-Line lists eleven different models of 30” under cabinet range hoods as being available as ductless. However, not a single one of these models is available with the ductless feature (it is basically an add on to already existing models), even though they have an entire section devoted to them. Upon inquiry, they responded with “We don’t know when we will have this option again”. Really? You can tease people with this on your website, but you can’t deliver on product? False advertising anyone? Back to the Unicorns… I can see pictures of them, but they are still not available!
So, after what has amounted to more than 20 hours of research (did I mention I am slightly anal retentive and mildly obsessed?), we are left with only two options.
1) Low end crap in the $75-$300 range. These range hoods are small, loud, low powered crap with aluminum mesh grease traps which may be dishwasher safe, but they have about as much durability as tinfoil with holes punched in it. They also tend to be very underscaled, with lots of plastic, and just plain ugly.
2) High end luxury models in the $1,400-$2,500 range from the likes of Wolf, Miele, Thermador, and several random “luxury” brands I have never heard of. They are beautiful, but are far out of our budget. The crazy thing about the luxury brands is they their lower end product is basically, a prettified version of the low end crap, only with a label and much higher price tag.
Neither of these options is gonna work. I am not going to design and build our dream kitchen to compromise on a crappy and powerless low end range hood, and we are not in a place to justify the luxury hood either. What to do?
I put my thinking cap on and decided there must be a way to make it work. As it turns out, while there are few ductless options in the canopy style of range hood, there are lots of ductless options in the wall mounted chimney style (go figure), but neither of us like or want that style. I don’t like the break-up of cabinets along the wall, and going this route would add to the cost of electrical because we would need to install additional outlets on the inside of the cabinets on both sides of the hood to accommodate under-cabinet lighting. We would also need to address how we carry the wall treatment up the wall behind the hood. And finally, we would lose small amount of cabinet space not taken up by the exhaust duct. In the end, the chimney style just creates more problems than answers. But…. Perhaps there is a solution!
Solution #1
I thought of this as I was grieving the loss of the range hood I had been carrying in my head for the past year. What if I go ahead and use the chimney style range hood, and have the top of the “pyramid” portion connect directly to the bottom of the upper cabinet, with the chimney portion (exhaust) taken through the cabinet and up and out the top by way of a diverter, thereby blowing the “clean” air back into the room.
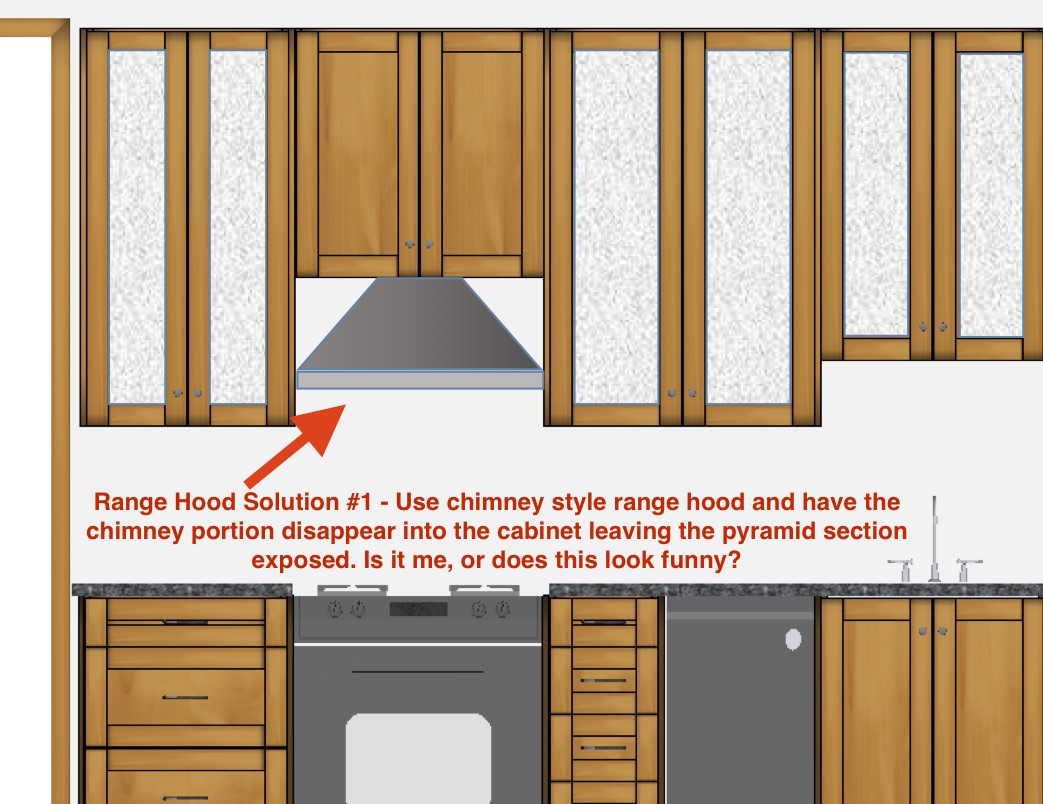
Solution #1: Using the chimney style wall hood, and having the pyramid portion exposed above the stove, but the chimney portion hidden inside a standard cabinet.
Not ideal, I think it looks funny…. But I sat on this idea for about 24 hours when I suddenly came up with another option.
Solution #2
What if we use this chimney style range hood and wrap it in cabinetry from the top of the bottom rim to the top of the existing cabinets, accepting that we will lose all storage above the range? Hmmm, This might work! (And, it’s only $300!) The flat ledge of this design would be perfect to have an upper cabinet rest upon, creating the illusion of a custom hood. One of the perks of using Barker Cabinets is that they have a special hood enclosure, which is a basic box designed for use with a range hood insert (which also does not have a ductless option) which can be custom sized within a quarter of an inch as needed! Here is how this would look!
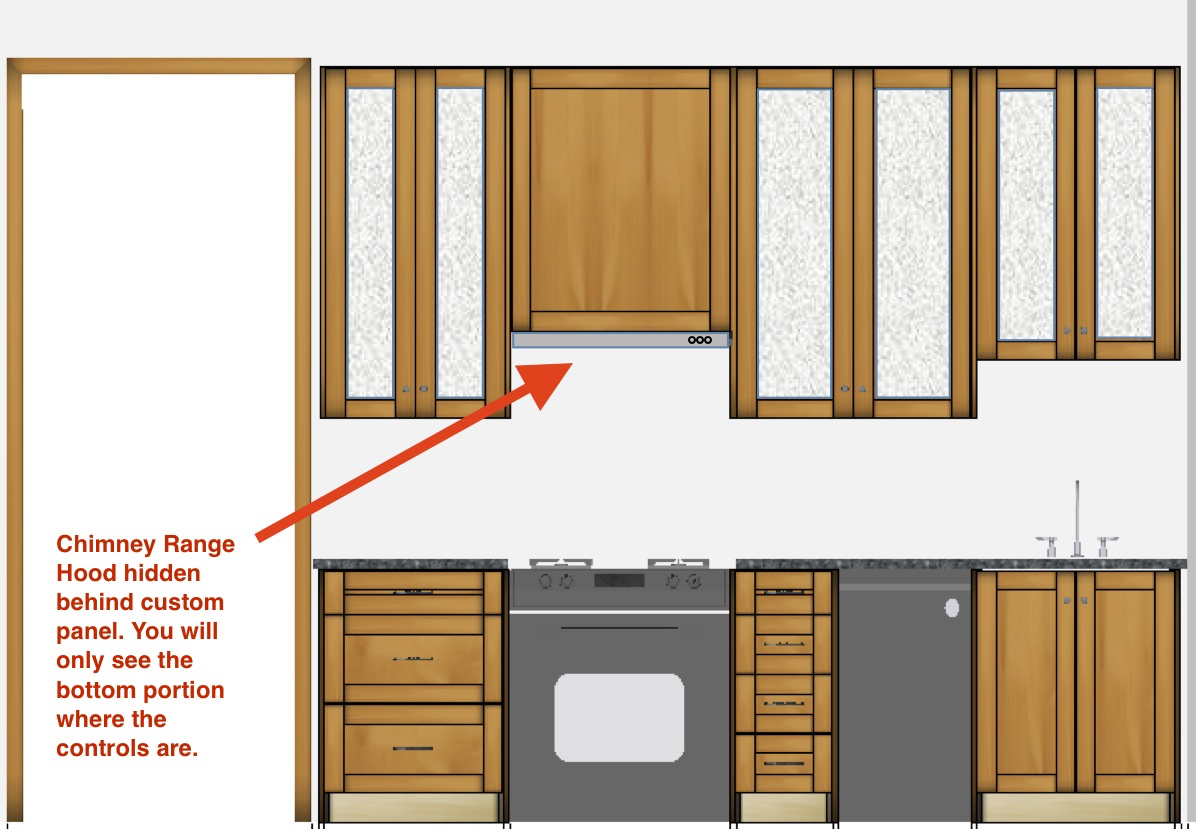
Solution #2: Same as Solution #1, except instead of having the pyramid portion exposed, hide it inside of a larger paneled enclosure leaving only the bottom portion exposed.
Hmmm… It’s not my original plan, but I think it could look fabulous! We will lose the use of the space as a cabinet for storage, but the front panel can be designed to be removable, and I can build in some shelving inside which we can use for long term storage of pretty much anything not affected by the residual heat rising from below. (So… No storage of candles.) We can also save on electrical work because we will only need one outlet for lighting which will be conveniently hidden behind the panel.
Well, that about wraps up this bit of drama…. We are still in the planning stages, but expect to make some major moves in the next few weeks as we order cabinets and our floor. I am sure at this point you are curious about how the whole kitchen is going to be laid out…. Not to worry, I will be preparing a post which will show the entire space plan as well as hopefully put the multiple pieces of the puzzle together. However, you can get a good hint by the image in solution #2. We plan to do glass uppers throughout… But there have been a few changes since our initial plans were posted this past summer.


0 Comments